Love this? Save it for later!
Share the inspiration with your friends
My neighbor’s kid, all of seven years old, stood at my kitchen door holding a plate of these cookies and said, “My mom said you’d know why these are better than the store ones,” and then just stared at me, waiting. I took one bite, and honestly, I had to sit down for a second. The cookie was soft in the middle, slightly crisp at the edges, and the spiderweb design wasn’t just a gimmick—it actually tasted like vanilla buttercream, not sugary paste. I asked for the recipe, and she told me it was her grandmother’s sugar cookie base with a trick she learned from a baking forum at 2 AM. That’s the kind of story these cookies deserve. They’re not just cute. They actually taste like someone cared about the cookie part, not just the decoration.
I’ve made them about six times since that day, tweaking the dough so it holds the web pattern without spreading into a blob, and I think I’ve finally got it right. The dough chills firm, the icing sets just enough to stay put, and the whole thing comes together without needing a piping bag or a steady hand. If you’ve ever tried to make Halloween cookies that look impressive but end up tasting like cardboard, this is for you.
Why You’ll Love This Recipe
I’m not going to pretend these cookies are health food. They’re butter, sugar, and a little bit of magic. But here’s what makes them different from every other Halloween cookie recipe you’ve seen.
- No Special Equipment Needed : You don’t need a piping bag, a spiderweb stencil, or any of those fancy decorating tools. A toothpick and a steady-ish hand are all you need to make the web pattern.
- The Cookie Actually Tastes Like Something : Most decorated sugar cookies are dry and flavorless. This one has a soft, chewy center with a slight tang from the cream cheese that makes it taste like a bakery cookie, not a craft project.
- Perfect for Halloween Parties : These are the kind of cookies that make people stop and say “wait, you made these?” without making you stress out the whole time.
- Kid-Approved and Adult-Enjoyed : The kids love the spiderweb design, and the adults appreciate that the cookie itself is actually good. No one’s picking off the frosting and leaving the rest.
- Make-Ahead Friendly : The dough freezes beautifully, and the decorated cookies stay fresh for days. You can spread the work out over a weekend.
I tested this recipe three times just to make sure the web pattern didn’t disappear into the oven. The first batch turned into blobs. The second batch was better. The third batch? I brought them to a Halloween party and someone asked if I had a bakery on the side. That’s the batch I’m sharing with you.
What Ingredients You Will Need
This recipe uses simple ingredients you probably already have in your kitchen. The key is getting the ratios right so the dough holds its shape during baking.
- Unsalted butter, softened (1 cup / 226g) — I use Kerrygold for the best flavor, but any good-quality unsalted butter works. Make sure it’s truly softened, not melted. Melted butter will make the cookies spread too much.
- Cream cheese, softened (4 oz / 113g) — This is the secret ingredient. The cream cheese adds a slight tang and keeps the cookies soft without making them cakey. Use full-fat for the best texture.
- Granulated sugar (1 cup / 200g) — Regular white sugar. Nothing fancy here.
- Large egg (1) — Room temperature is best. If you forget to take it out of the fridge, put it in a bowl of warm water for 5 minutes.
- Vanilla extract (2 teaspoons) — Pure vanilla extract, not imitation. It makes a difference in the final flavor.
- All-purpose flour (2 ½ cups / 312g) — Spoon and level your flour. Scooping directly from the bag packs it down and gives you too much flour, which makes dry cookies.
- Baking powder (1 teaspoon) — Make sure it’s not expired. Fresh baking powder makes a difference in lift.
- Salt (½ teaspoon) — I use fine sea salt. It balances the sweetness.
- For the spiderweb icing :
- Powdered sugar (1 ½ cups / 180g)
- Milk (2-3 tablespoons) — Start with 2 and add more if needed.
- Vanilla extract (½ teaspoon)
- Black food coloring (gel-based, not liquid) — Liquid food coloring will thin out the icing too much. I use the Chefmaster brand.
- Orange food coloring (optional, for the base icing)
For the spiderweb design, you’ll also want a small bowl of black icing and a toothpick or a thin skewer.
Equipment Needed
You don’t need much for this recipe, which is part of the appeal.
- Electric mixer (hand or stand) — You can cream the butter and sugar by hand, but it takes a while and your arm will get tired. A hand mixer works perfectly.
- Baking sheets (2) — Light-colored aluminum sheets work best. Dark sheets can cause the bottoms to brown too fast.
- Parchment paper or silicone baking mats — I prefer parchment because it’s easier to clean up, but silicone mats work great too.
- Round cookie cutter (2.5 to 3 inches) — Any size works, but the web pattern shows up best on cookies that are at least 2.5 inches wide.
- Toothpicks or a thin skewer — For making the spiderweb design. You can also use the tip of a paring knife, but toothpicks are easier to control.
- Small piping bags or zip-top bags — For the icing. You don’t need actual piping tips. Just snip a tiny corner off the bag.
- Cooling rack — Essential for letting the cookies cool completely before decorating.
If you don’t have a round cookie cutter, you can use the rim of a drinking glass. Just dip it in flour first so it doesn’t stick to the dough.
Preparation Method
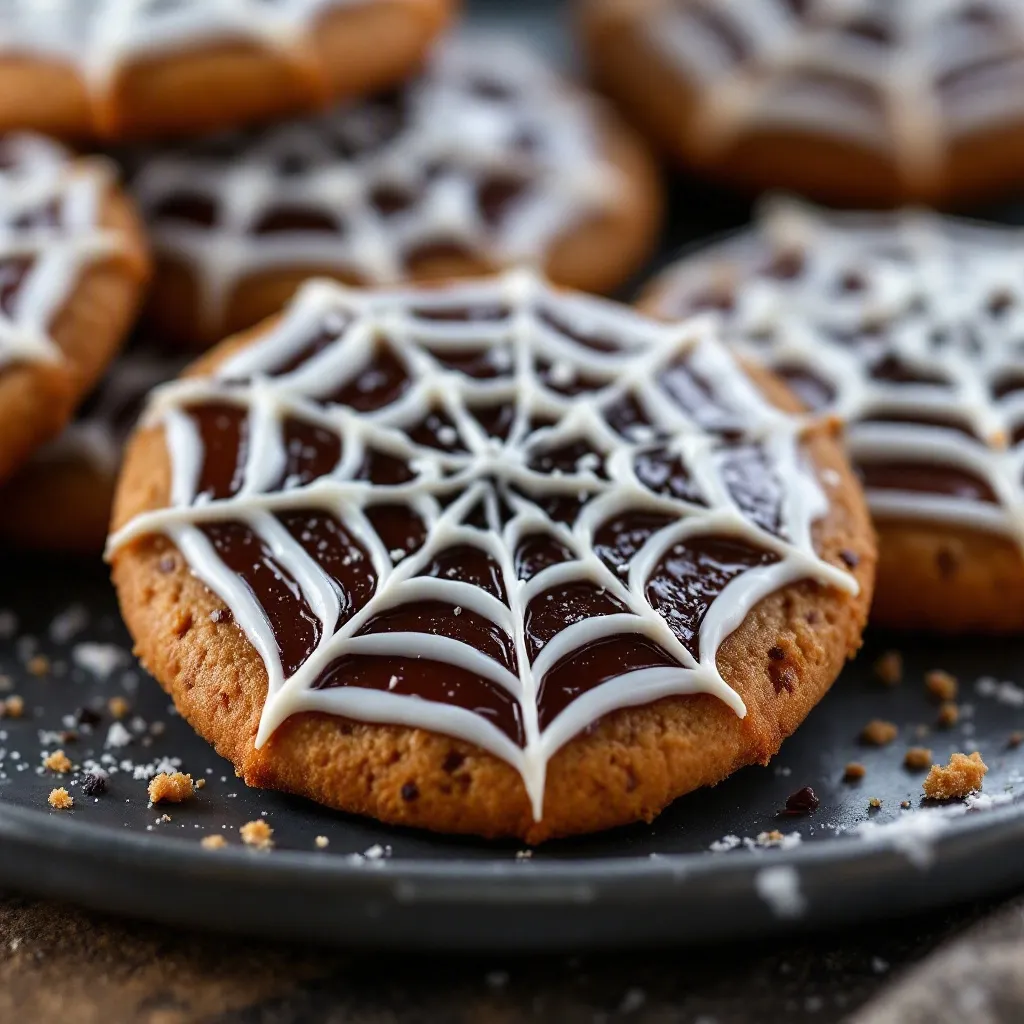
This recipe has a few steps, but none of them are complicated. The most important thing is chilling the dough. Don’t skip it.
Step 1: Make the Dough
In a large bowl, cream together the softened butter, cream cheese, and sugar until light and fluffy, about 3 minutes with a hand mixer on medium speed. Scrape down the sides of the bowl once or twice. Add the egg and vanilla extract and beat until combined, about 30 seconds.
In a separate bowl, whisk together the flour, baking powder, and salt. Gradually add the dry ingredients to the wet ingredients, mixing on low speed until just combined. Don’t overmix. The dough should be soft but not sticky. If it feels too sticky, add another tablespoon of flour.
Step 2: Chill the Dough
Divide the dough in half, flatten each half into a disk, wrap tightly in plastic wrap, and refrigerate for at least 2 hours. I know it’s tempting to skip this step, but don’t. Chilled dough holds its shape better and makes the spiderweb pattern much cleaner. You can chill it overnight if you want.
Step 3: Cut and Bake
Preheat your oven to 350°F (175°C). Line two baking sheets with parchment paper.
On a lightly floured surface, roll out one disk of dough to about ¼-inch thickness. Use your round cookie cutter to cut out shapes. Place them about 2 inches apart on the prepared baking sheets. Gather the scraps, re-roll, and cut more cookies.
Bake for 8-10 minutes, or until the edges are just barely golden. The centers should still look slightly pale. Let the cookies cool on the baking sheet for 5 minutes, then transfer to a cooling rack to cool completely. Don’t try to decorate warm cookies. The icing will melt and slide right off.
Step 4: Make the Spiderweb Icing
While the cookies cool, make the icing. In a small bowl, whisk together the powdered sugar, 2 tablespoons of milk, and ½ teaspoon of vanilla extract. You want a thick but spreadable consistency. If it’s too thick, add another ½ tablespoon of milk. If it’s too thin, add more powdered sugar.
Divide the icing into two bowls. Color one bowl with orange food coloring (or leave it white if you prefer). Color the other bowl with black food coloring. Transfer each color into separate small piping bags or zip-top bags. Snip a tiny corner off each bag.
Step 5: Create the Spiderweb Design
This is the fun part. Pipe a circle of orange (or white) icing in the center of each cookie, about the size of a quarter. Then pipe concentric rings around it, like a target. You want about 3-4 rings total.
While the icing is still wet, pipe small dots of black icing in the center circle. Then, using a toothpick, drag the black icing outward through the rings to create the web pattern. Wipe the toothpick clean between each drag. You can also drag from the outside in for a different look. The key is working quickly before the icing sets.
Let the decorated cookies sit at room temperature for about 30 minutes to allow the icing to set.
Cooking Tips & Techniques
I’ve made enough mistakes with these cookies to fill a small book. Here’s what I learned the hard way.
Don’t overmix the dough. Overmixing develops the gluten and makes the cookies tough. Mix until the flour just disappears, then stop. A few streaks of flour are fine.
Chill the dough twice if you have time. I know that sounds excessive, but I’ve noticed that chilling the cut-out cookies on the baking sheet for 10 minutes before baking helps them hold their shape even better. It’s an extra step, but it makes a difference.
Use gel food coloring, not liquid. Liquid food coloring will thin out your icing and make it runny. Gel coloring gives you a deep, vibrant color without changing the consistency. I learned this the hard way when my first batch of black icing turned into gray soup.
Work in small batches. Don’t try to ice all the cookies at once. The icing starts to set after a few minutes, so work on 3-4 cookies at a time. This gives you enough time to create the web pattern before the icing hardens.
If the icing is too thick, microwave it for 5 seconds. This softens it just enough to pipe smoothly. But don’t overheat it, or it will become too runny.
Variations & Adaptations
This recipe is pretty forgiving, so feel free to play around with it.
Gluten-Free Version : Substitute the all-purpose flour with a 1:1 gluten-free baking flour blend. I’ve used the King Arthur brand with good results. The texture will be slightly more crumbly, but the flavor is still there.
Vegan Version : Use vegan butter and a vegan cream cheese substitute. Replace the egg with a flax egg (1 tablespoon ground flaxseed mixed with 3 tablespoons water, let sit for 5 minutes). The texture won’t be exactly the same, but it’s close enough for a Halloween treat.
Different Web Colors : You don’t have to stick with orange and black. Try purple and green for a witchy vibe, or white and red for a creepy blood-spider look. I made a batch with neon green and black for a Halloween party and they were a hit.
Add Sprinkles : Before the icing sets, sprinkle some edible glitter or orange sprinkles on top. It adds a little extra sparkle that kids love.
Spider Addition : If you want to go all out, you can add a small plastic spider ring on top of each cookie. Just press it gently into the wet icing and let it set. I did this for a party and the kids went crazy for them.
Serving & Storage Suggestions
These cookies are best served at room temperature. The icing sets firm enough to stack them, but they’re soft enough to bite into without cracking.
Serving Ideas : Serve them on a Halloween-themed platter with a glass of cold milk or a warm cup of spiced cider. They also pair surprisingly well with a scoop of vanilla ice cream. If you’re hosting a Halloween party, arrange them on a tiered stand for a dramatic effect.
Storage : Store the decorated cookies in an airtight container at room temperature for up to 5 days. Layer them between sheets of parchment paper to prevent the icing from sticking. Do not refrigerate them. The fridge dries out the cookies and makes them hard.
Freezing : You can freeze the undecorated baked cookies for up to 3 months. Just wrap them tightly in plastic wrap and then in foil. When you’re ready to decorate, thaw them at room temperature for about 30 minutes, then ice them as directed. I’ve also frozen the raw dough disks for up to 2 months. Just thaw them in the fridge overnight before rolling and cutting.
Flavor Development : I honestly think these cookies taste even better the next day. The flavors meld together, and the cookie softens just slightly. If you can resist eating them all on day one, you’re in for a treat on day two.
Nutritional Information & Benefits
Let’s be real. These are sugar cookies with icing. They’re a treat, not a health food. But here’s the breakdown if you’re curious.
Per cookie (based on 24 cookies):
- Calories: 185
- Fat: 9g
- Carbohydrates: 25g
- Protein: 2g
- Sugar: 16g
Dietary Considerations : This recipe contains dairy (butter, cream cheese, milk) and gluten (flour). It can be adapted to be vegan or gluten-free as mentioned above. It is not suitable for a nut-free diet unless you verify all your ingredients are processed in a nut-free facility.
Health Benefits : Okay, so these aren’t exactly a superfood. But the cream cheese adds a small amount of protein and calcium, and the butter provides vitamin A. Plus, there’s the mental health benefit of making something beautiful and sharing it with people you love. That counts for something, right?
My Take : I’m not one to pretend cookies are healthy. But I do believe in balance. Make these for a special occasion, enjoy every single bite, and don’t feel guilty about it. Life is too short for bad cookies.
Conclusion
These Spiderweb Halloween Sugar Cookies are the kind of recipe that makes you look like a baking hero without actually having to work that hard. The dough is forgiving, the design is impressive, and the flavor is genuinely good. I’ve made them for Halloween parties, school bake sales, and just because I wanted something pretty to look at while drinking my coffee.
If you make these, please come back and tell me how they turned out. Did you add spiders? Did you use different colors? Did your kids help with the toothpick part? I love hearing about your kitchen adventures. And if you’re looking for more Halloween inspiration, you might enjoy these Black Velvet Cupcakes I made last year, or these Mummy Wrapped Sausages that are perfect for a party spread.
Happy Halloween, and happy baking. You’ve got this.
Frequently Asked Questions
Can I make the dough ahead of time?
Absolutely. The dough can be refrigerated for up to 3 days or frozen for up to 2 months. Just wrap it tightly in plastic wrap. When you’re ready to bake, let it sit at room temperature for about 10 minutes to soften slightly before rolling.
Why did my cookies spread in the oven?
This usually happens for one of three reasons: the dough wasn’t chilled enough, the butter was too soft, or the baking sheet was too warm. Make sure your dough is thoroughly chilled, and let your baking sheets cool completely between batches.
Can I use liquid food coloring instead of gel?
You can, but the icing will be thinner and harder to control. If you only have liquid coloring, add a little extra powdered sugar to compensate for the extra liquid. The color might not be as vibrant, but it will still work.
How do I get the spiderweb pattern to look clean?
The key is working quickly while the icing is still wet. Drag your toothpick in one smooth motion from the center outward. Wipe the toothpick clean between each drag to avoid smearing colors together. Practice on a piece of parchment paper first if you’re nervous.
Can I use a different icing for the spiderweb?
Sure. Royal icing works great and dries harder, which makes the cookies easier to stack. You can also use melted white chocolate tinted with food coloring. Just be aware that different icings have different drying times, so you’ll need to adjust your technique accordingly.
Pin This Recipe!
Perfect Spiderweb Halloween Sugar Cookies
Soft, chewy sugar cookies with a cream cheese twist, topped with a stunning spiderweb icing design. No special equipment needed, just a toothpick and a steady hand for a show-stopping Halloween treat.
- Prep Time: 30 minutes
- Cook Time: 10 minutes
- Total Time: 2 hours 40 minutes (includes 2 hours chilling)
- Yield: 24 cookies 1x
- Category: Dessert
- Cuisine: American
Ingredients
- 1 cup (226g) unsalted butter, softened
- 4 oz (113g) cream cheese, softened
- 1 cup (200g) granulated sugar
- 1 large egg, room temperature
- 2 teaspoons pure vanilla extract
- 2 ½ cups (312g) all-purpose flour, spooned and leveled
- 1 teaspoon baking powder
- ½ teaspoon fine sea salt
- 1 ½ cups (180g) powdered sugar
- 2–3 tablespoons milk
- ½ teaspoon vanilla extract
- Black gel food coloring
- Orange gel food coloring (optional)
Instructions
- In a large bowl, cream together the softened butter, cream cheese, and sugar until light and fluffy, about 3 minutes with a hand mixer on medium speed. Scrape down the sides of the bowl once or twice. Add the egg and vanilla extract and beat until combined, about 30 seconds.
- In a separate bowl, whisk together the flour, baking powder, and salt. Gradually add the dry ingredients to the wet ingredients, mixing on low speed until just combined. Do not overmix. The dough should be soft but not sticky. If it feels too sticky, add another tablespoon of flour.
- Divide the dough in half, flatten each half into a disk, wrap tightly in plastic wrap, and refrigerate for at least 2 hours (or overnight).
- Preheat oven to 350°F (175°C). Line two baking sheets with parchment paper.
- On a lightly floured surface, roll out one disk of dough to about ¼-inch thickness. Use a round cookie cutter (2.5 to 3 inches) to cut out shapes. Place them about 2 inches apart on the prepared baking sheets. Gather scraps, re-roll, and cut more cookies.
- Bake for 8-10 minutes, or until the edges are just barely golden. The centers should still look slightly pale. Let the cookies cool on the baking sheet for 5 minutes, then transfer to a cooling rack to cool completely.
- While the cookies cool, make the icing. In a small bowl, whisk together the powdered sugar, 2 tablespoons of milk, and ½ teaspoon of vanilla extract. You want a thick but spreadable consistency. If too thick, add another ½ tablespoon of milk. If too thin, add more powdered sugar.
- Divide the icing into two bowls. Color one bowl with orange food coloring (or leave it white). Color the other bowl with black food coloring. Transfer each color into separate small piping bags or zip-top bags. Snip a tiny corner off each bag.
- Pipe a circle of orange (or white) icing in the center of each cookie, about the size of a quarter. Then pipe concentric rings around it, like a target (about 3-4 rings total).
- While the icing is still wet, pipe small dots of black icing in the center circle. Using a toothpick, drag the black icing outward through the rings to create the web pattern. Wipe the toothpick clean between each drag. Work quickly before the icing sets.
- Let the decorated cookies sit at room temperature for about 30 minutes to allow the icing to set.
Notes
Chill the dough for at least 2 hours to prevent spreading. Use gel food coloring for vibrant icing without thinning it. Work on 3-4 cookies at a time when creating the web pattern, as the icing sets quickly. Cookies taste even better the next day.
Nutrition
- Serving Size: 1 cookie
- Calories: 185
- Sugar: 16
- Sodium: 95
- Fat: 9
- Saturated Fat: 5
- Carbohydrates: 25
- Protein: 2
Keywords: Halloween cookies, spiderweb cookies, sugar cookies, cream cheese sugar cookies, decorated cookies, Halloween dessert, easy Halloween recipe



