Love this? Save it for later!
Share the inspiration with your friends
The house is quiet now. The kids are finally asleep, and the last of the trick-or-treaters have gone home, leaving behind just a few stray wrappers and the lingering smell of autumn leaves. It’s that specific, heavy silence that only exists on Halloween night. I’m sitting at the kitchen table, still wearing my oversized cardigan, staring at the box of candy corn I bought on impulse. You know how it is—those little triangular candies that are equal parts nostalgic and polarizing. Half the neighborhood loves them; the other half looks at them like they’re radioactive waste.
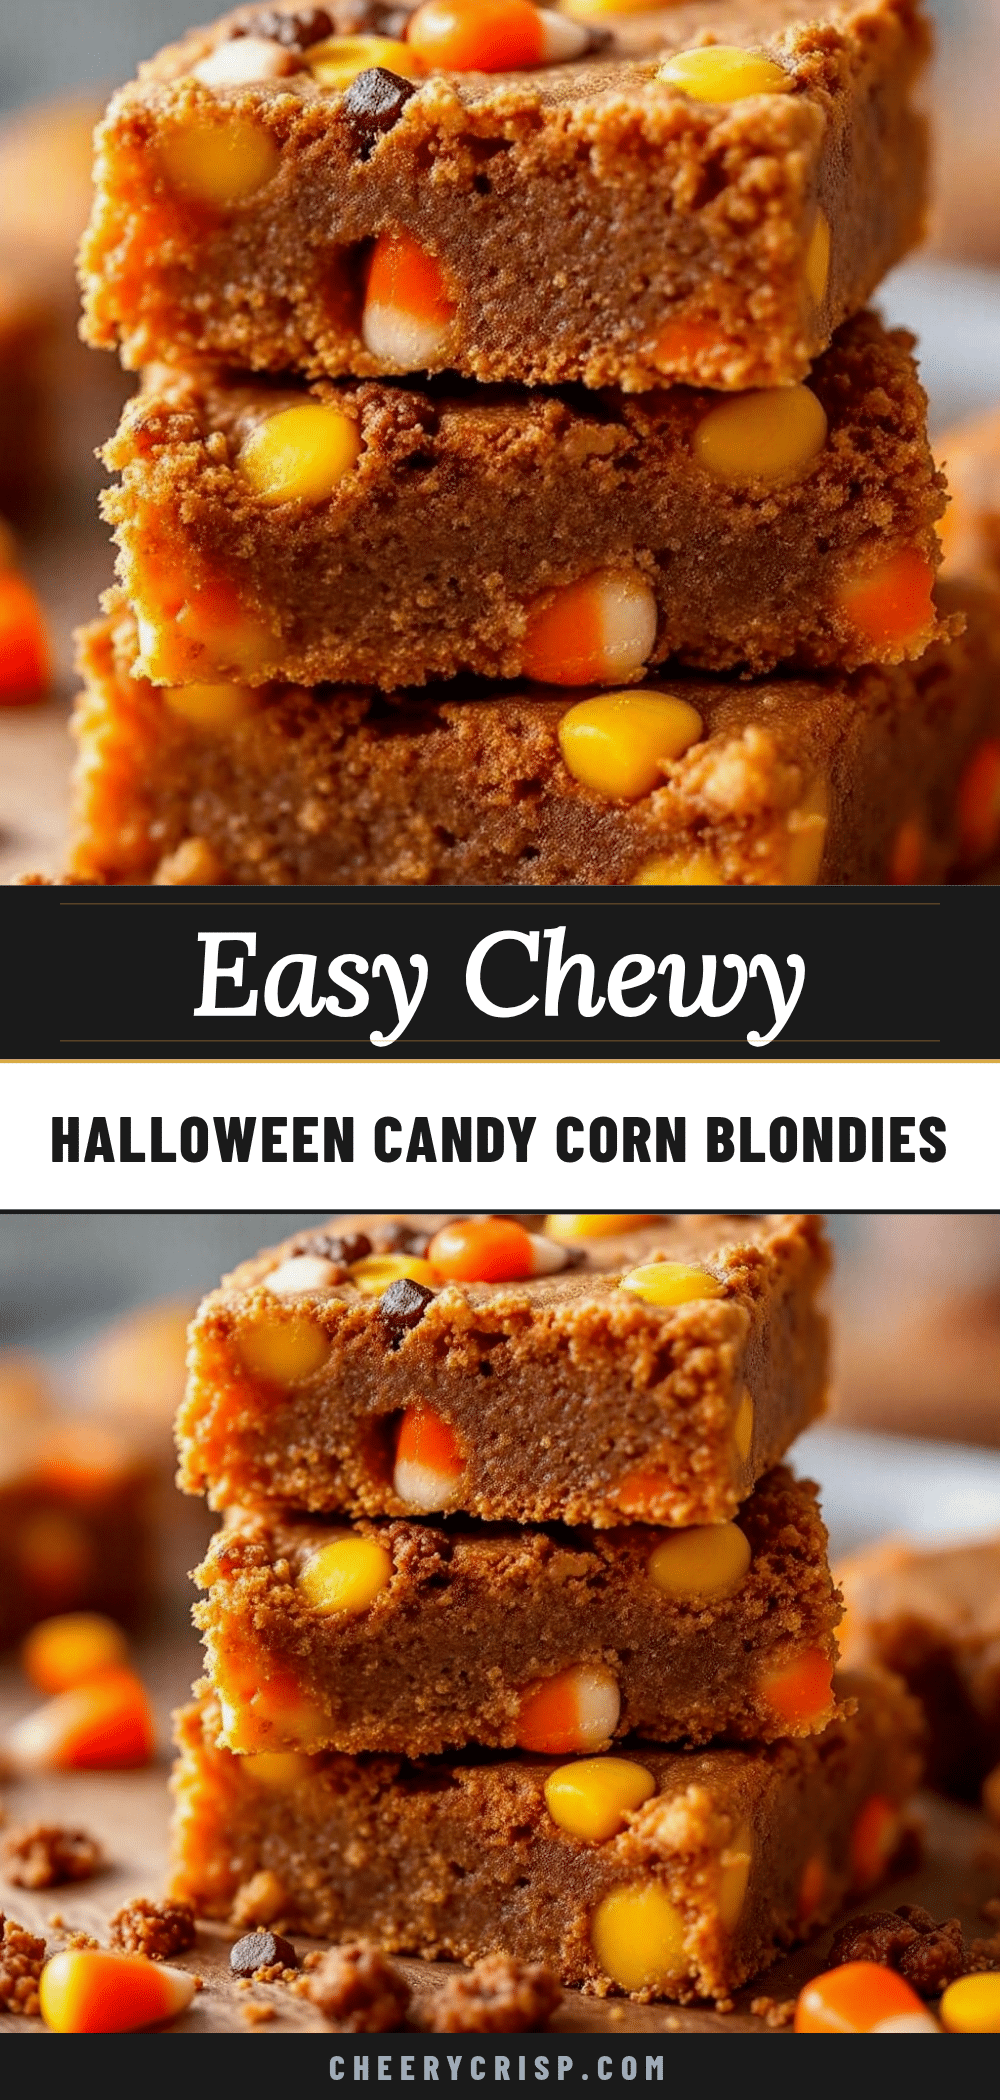
Honestly, I used to hate them. I thought they were just waxy sugar with an attitude problem. But then, last year, I accidentally dropped a handful into a batch of plain blondie batter. I didn’t even mean to do it. I was distracted by a phone call, and before I knew it, those little pastel triangles were melting into the dough. I pulled the pan out of the oven, expecting a mess. What I got was magic. The white melted into a creamy swirl, the yellow turned golden and rich, and the orange added this weird, citrusy brightness that actually worked.
It wasn’t just a dessert; it was a memory. It tasted like standing on a front porch in 2004, holding a plastic pumpkin bucket, waiting for your parents to check your haul. That’s the thing about food—it doesn’t just feed you. It takes you back. These Easy Halloween Candy Corn Blondies aren’t fancy. They don’t have intricate icing or spooky decorations. They are just soft, chewy, buttery bars with pockets of melty candy corn scattered throughout. They are simple, they are forgiving, and they are exactly what I needed tonight. I made a double batch, and even now, the scent of vanilla and caramelized sugar is drifting through the hallway. It feels like a small, sweet victory after a long day of chaos.
Why You’ll Love This Recipe
Let’s be real for a second. Not every dessert needs to be a five-act play with soufflés and tempering chocolate. Sometimes, you just want something that comes together while you’re watching TV. These blondies are the definition of low-effort, high-reward. I’ve tested this recipe at least four times now, tweaking the ratio of butter to sugar until it hit that perfect spot—crisp on the edges, fudgy in the middle. It’s not just about convenience; it’s about getting that specific texture right without the headache.
Here is why this recipe earns its spot in your rotation:
* **Quick & Easy:** You don’t need a stand mixer or a dozen bowls. This comes together in about 15 minutes of prep time, making it perfect for those last-minute Halloween parties or when you just need a sweet fix before bed.
* **Simple Ingredients:** No fancy grocery trips needed. You likely already have everything in your kitchen. Flour, sugar, butter, eggs, and a bag of candy corn. That’s it. It’s pantry-friendly and stress-free.
* **Perfect for Halloween Parties:** Great for classroom exchanges, neighborhood potlucks, or just passing out to kids at the door. They look festive but don’t require any artistic skill to make.
* **Crowd-Pleaser:** Always gets rave reviews from kids and adults alike. Even the people who claim they “don’t like candy corn” usually admit these are good. The baking process changes the flavor profile enough to win them over.
* **Unbelievably Delicious:** The texture and flavor combo is next-level comfort food. The contrast between the chewy blondie base and the semi-melted candy corn pieces is addictive.
What makes this different from the rest? A lot of candy corn recipes try to make the candy corn the star, using it as a garnish on top. But here, the candy corn is baked *into* the batter. This allows the colors to bleed slightly into the dough, creating those beautiful marbled streaks of orange, yellow, and white. It’s a technique that turns a cheap bag of candy into something that tastes artisanal. It’s comfort food reimagined—simpler, faster, but with the same soul-soothing satisfaction as a warm cookie. It’s perfect for impressing guests without stress, or turning a simple Tuesday night into something memorable.
What Ingredients You Will Need
This recipe uses simple, wholesome ingredients to deliver bold flavor and satisfying texture without the fuss. The beauty of blondies is that they rely on the quality of a few key components rather than a long list of exotic spices. Since we are folding in candy corn, the base needs to be sturdy enough to hold its shape but soft enough to provide a chewy contrast.
Here is what you’ll need to get started:
* **Unsalted Butter:** You’ll need about one cup (2 sticks). I recommend using high-quality European-style butter if you can find it, like Land O’Lakes or Plugra, because the higher fat content gives a richer, more nutty flavor when melted. Make sure it is softened but not melted for the creaming step.
* **Granulated Sugar:** One cup of white sugar. This provides the crisp edges. Some recipes use brown sugar only for chewiness, but the white sugar here helps create that desirable crackly top.
* **Dark Brown Sugar:** One cup, packed. This is the secret to the fudgy interior. It adds moisture and a hint of molasses depth that balances the sweetness of the candy corn.
* **Large Eggs:** Two large eggs, room temperature. Room temp eggs emulsify better with the butter and sugar, creating a smoother batter. Don’t skip this step if you want a uniform texture.
* **Pure Vanilla Extract:** Two teaspoons. Good vanilla makes all the difference. I use Nielsen-Massey or McCormick’s Best. It rounds out the flavors and makes the blondies taste like they came from a bakery, not a box mix.
* **All-Purpose Flour:** Two and a half cups. This is the structure. Don’t use cake flour here; you want that classic blondie chew. Sift it if it’s lumpy, but generally, a quick whisk is fine.
* **Baking Powder:** One teaspoon. This gives the blondies a slight lift so they aren’t dense like a brick.
* **Salt:** Half a teaspoon. Essential for balancing the sweetness. It makes the flavors pop.
* **Candy Corn:** Two standard bags (about 10-12 ounces total). This is the star. Look for the brand with the distinct layers of orange, yellow, and white. Some cheaper brands are all one color, and that won’t give you the classic look.
If you want to get fancy, you can add a handful of white chocolate chips to the mix, but honestly, the candy corn provides enough sweetness and melt. If you are sensitive to artificial colors, you can use organic candy corn, though they are harder to find. For seasonal variations, in the fall, you might swap half the candy corn for mini pumpkins or ghosts, but the classic tri-color is iconic for a reason.
Equipment Needed
You don’t need a lot of fancy gear for this. The simplicity is part of the appeal. Here is what you’ll need to have on hand:
* **9×13 Inch Baking Pan:** This is the standard size for this recipe. I prefer a glass pan like Pyrex because it heats evenly and makes it easier to see the bottom browning. If you use a metal pan, the edges might brown faster, so keep an eye on it. A dark non-stick pan will also brown the edges quickly, so you may want to reduce the oven temperature by 25 degrees.
* **Large Mixing Bowl:** You need something big enough to hold the butter, sugars, and flour without spilling. A ceramic or glass bowl works well.
* **Hand Mixer or Fork:** You can use an electric hand mixer for the butter and sugar, which takes about 2-3 minutes. If you don’t have one, a sturdy fork or a wooden spoon works fine. It just takes a bit more elbow grease.
* **Rubber Spatula:** Essential for folding in the flour and the candy corn. You need to be gentle here so you don’t crush the candy corn into dust. A silicone spatula is best because it scrapes the bowl clean.
* **Parchment Paper:** I highly recommend lining your pan with parchment paper, leaving an overhang on the sides. This makes removing the blondies a breeze and means less cleanup. You won’t need to grease the pan if you use parchment.
* **Cooling Rack:** While not strictly necessary, letting the blondies cool on a rack helps prevent the bottom from getting soggy from trapped steam.
If you don’t have a 9×13 pan, you can use an 8×8 pan, but the blondies will be thicker and take longer to bake. You’ll need to check them about 10-15 minutes later than the original time. Budget-friendly tip: If you’re low on parchment, you can grease the pan well with butter and dust it with flour, but the parchment makes cleanup so much easier that it’s worth buying a roll.
Preparation Method
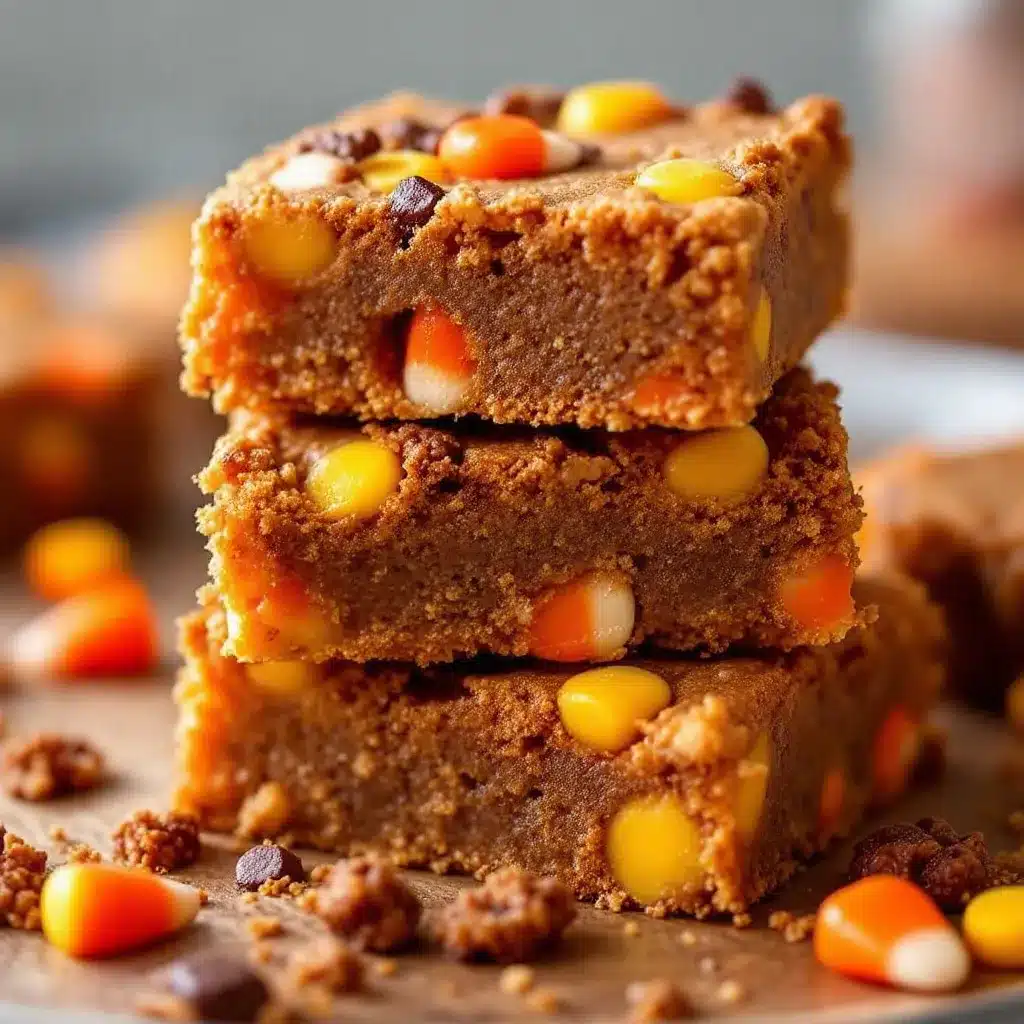
Getting these ready is straightforward, but there are a few small details that make a big difference in the final result. Let’s walk through it step by step.
1. **Prep the Oven and Pan (5 minutes):** Preheat your oven to 350°F (175°C). Line your 9×13 inch baking pan with parchment paper. Leave a few inches of overhang on the long sides so you can lift the finished blondies out later. This is a game-changer for clean slices.
2. **Cream the Butter and Sugars (3-4 minutes):** In your large mixing bowl, combine the softened unsalted butter, granulated sugar, and dark brown sugar. If using an electric mixer, beat this on medium-high speed until the mixture is light and fluffy. This usually takes about 3 minutes. You want the sugar to dissolve slightly into the butter. If mixing by hand, just stir vigorously until it looks creamy. This step incorporates air, which helps the blondies rise slightly.
3. **Add Eggs and Vanilla (1 minute):** Crack the two eggs into the bowl. Add the vanilla extract. Beat on low speed just until combined. Be careful not to overmix here, or the blondies can become tough. The mixture might look a bit separated at first; that’s normal.
4. **Combine Dry Ingredients (1 minute):** In a separate small bowl, whisk together the all-purpose flour, baking powder, and salt. This ensures the baking powder is evenly distributed so you don’t get bitter spots.
5. **Mix Wet and Dry (2 minutes):** Gradually add the dry ingredients to the wet ingredients. If using a mixer, switch to low speed. Mix just until the flour disappears. Overmixing develops gluten, which leads to tough blondies. You want it to look shaggy and incomplete. If using a spatula, fold gently.
6. **Fold in Candy Corn (2 minutes):** This is the fun part. Pour in about one and a half bags of candy corn. Use your rubber spatula to gently fold them into the batter. Be gentle! You want the candy corn to stay whole, not crushed. Save the last half bag for the top.
7. **Transfer to Pan (1 minute):** Scrape the batter into your prepared pan. Spread it out evenly with the spatula. It should be thick and dense.
8. **Top with Remaining Candy Corn (1 minute):** Sprinkle the remaining candy corn evenly over the top of the batter. Press them down lightly so they stick to the surface. This ensures you get a piece in every bite and gives that classic spotted look.
9. **Bake (30-35 minutes):** Place the pan in the center of the oven. Bake for 30-35 minutes. The blondies are done when the edges are golden brown and the center is just set. It should spring back lightly when touched. A toothpick inserted into the center should come out with a few moist crumbs, but no wet batter. If it comes out clean, they might be overbaked.
10. **Cool Completely (1 hour):** This is the hardest part. Let the blondies cool in the pan on a wire rack for at least one hour. If you cut them while they are hot, they will fall apart and be messy. The structure sets as they cool. Once cool, lift them out using the parchment overhang and slice into squares.
Cooking Tips & Techniques
I’ve made my fair share of baking mistakes over the years, so here are a few things to watch out for to ensure your Easy Halloween Candy Corn Blondies turn out perfect.
First, **don’t overbake**. Blondies continue to cook in the pan after you take them out of the oven due to residual heat. If the center looks slightly underdone when you pull it out, that’s actually good. It will firm up as it cools. Overbaked blondies are dry and crumbly, which is the opposite of what we want.
Second, **room temperature ingredients matter**. If your eggs are cold, they can cause the butter to seize up when you add them, leading to a lumpy batter. Take your eggs out of the fridge 30 minutes before you start. If you forget, you can warm them in a bowl of warm water for a few minutes.
Third, **measure your flour correctly**. If you scoop the flour directly from the bag with the measuring cup, you might pack it down, leading to too much flour and dense blondies. Instead, fluff the flour with a spoon, then scoop it gently and level it off with a knife. This “spoon and level” method is crucial for tender baked goods.
Another tip: **if you want extra chew**, add a tablespoon of cornstarch to the flour mixture. It interferes with gluten formation slightly, keeping the texture soft and chewy. I’ve tried this with these blondies, and it works wonders.
Finally, **be patient with the cooling**. I know it’s tempting to dig in as soon as you take the pan out, but resist the urge. Cutting warm blondies is a recipe for disaster. They will be gooey and fall apart. Let them sit for that full hour. The flavors meld and deepen as they cool, making them taste even better.
Variations & Adaptations
While the classic candy corn version is my favorite, there are plenty of ways to tweak this recipe to suit your tastes or dietary needs.
**Gluten-Free Option:** You can substitute the all-purpose flour with a 1:1 gluten-free baking flour blend. Look for a brand that includes xanthan gum, or add a quarter teaspoon if your blend doesn’t have it. The texture will be slightly more delicate, but still delicious.
**Vegan Twist:** Swap the butter for a high-quality vegan butter stick (like Miyoko’s or Earth Balance) and use flax eggs (one tablespoon ground flaxseed mixed with three tablespoons water per egg) instead of regular eggs. The candy corn needs to be verified as vegan, as some brands use confectioner’s glaze (shellac) or gelatin. Many organic brands are vegan-friendly.
**Flavor Variation – Pumpkin Spice:** Add one teaspoon of pumpkin pie spice to the dry ingredients and swap half of the candy corn for mini pumpkin-shaped candies. This leans into the fall vibe even more.
**Flavor Variation – White Chocolate Chip:** For a less sugary-sweet option, replace half of the candy corn with white chocolate chips. The chips will melt into pockets of creaminess, while the remaining candy corn adds texture and color.
**Dairy-Free:** Use dairy-free butter and ensure your candy corn is dairy-free (most are, but check labels). The result is surprisingly rich and satisfying.
I once tried adding a swirl of peanut butter into the batter before baking, which created these amazing marbled ribbons. It was a hit at a party, though it did change the baking time slightly. Experimentation is half the fun of baking.
Serving & Storage Suggestions
These blondies are best served at room temperature. They have a chewy, soft texture that is lost if they are refrigerated. If you need to store them, keep them in an airtight container at room temperature for up to 3 days. Place a piece of bread in the container with them; the bread will stale instead of the blondies, keeping them soft.
For longer storage, you can freeze them. Wrap individual squares in plastic wrap and place them in a freezer-safe bag. They will keep for up to 2 months. Thaw them at room temperature for about 30 minutes before eating.
They pair wonderfully with a glass of cold milk, of course. But for a more adult twist, serve them with a cup of hot coffee or a spiced cider. The warmth of the drink contrasts nicely with the sweet, chewy bars.
If you have leftover candy corn, you can store it in a cool, dry place. But honestly, you’ll likely use it all in this recipe. The flavors of the blondies actually improve after a day, as the sugar fully hydrates the flour, making them even chewier.
Nutritional Information & Benefits
Let’s talk numbers. While these are definitely a treat, they are relatively straightforward in their composition. Each square (assuming 16 servings) contains approximately 280 calories. The primary sources of calories are the butter, sugar, and flour.
There is a small amount of protein from the eggs and flour, but this is primarily a carbohydrate and fat-heavy snack. For those watching their sugar intake, be mindful of the portion size, as the candy corn adds a significant sugar load. However, compared to store-bought Halloween candy bars, these are homemade, so you control the quality of the ingredients.
They are not naturally gluten-free or vegan, but adaptations are easy as noted above. For a slightly healthier twist, you could reduce the sugar by a quarter cup, though the texture will be less crisp. They are a great way to use up that bag of candy corn you bought for the holiday, turning it into something more substantial than just loose candy.
Conclusion
There is something special about baking on a quiet night, especially when the result is as comforting as these Easy Halloween Candy Corn Blondies. They are simple, nostalgic, and incredibly easy to make. I hope you try this recipe and create your own memories around it. Maybe it’s a quiet night in, or maybe it’s sharing them with neighbors. Either way, they are worth the effort.
Feel free to customize them with your favorite mix-ins or dietary swaps. I’d love to hear how they turn out for you. Leave a comment below with your thoughts, or share a photo if you post it on social media. Tag me so I can see your creations!
Thanks for stopping by. Happy baking, and enjoy every sweet, chewy bite.
Frequently Asked Questions
Can I use homemade candy corn?
Yes, you can use homemade candy corn, but be aware that homemade versions are often softer and stickier. They may melt more into the batter than store-bought versions, so you might get less distinct color separation.
Why are my blondies dry?
This usually happens if they are overbaked. Remember, blondies continue to cook in the pan. Remove them when the center looks just set, not when it looks completely done. Also, check your flour measurement to ensure you didn’t pack it in too tightly.
Can I freeze the batter?
It’s not recommended to freeze the batter with the candy corn in it, as the candy corn can absorb moisture and become sticky or discolored. It’s better to freeze the baked blondies after they have cooled completely.
What size pan should I use?
A 9×13 inch pan is ideal for this recipe. If you use an 8×8 pan, the blondies will be thicker and require more baking time (check at 40-45 minutes). A 9×9 square pan will also work but will result in thicker bars.
Is candy corn vegan?
Most conventional candy corn is not vegan because it contains confectioner’s glaze (derived from beetles) and sometimes gelatin. Look for brands that specifically label themselves as vegan or organic, which often use plant-based waxes and sugars.
Pin This Recipe!
Easy Halloween Candy Corn Blondies: 5-Ingredient Treat
Soft, chewy, buttery blondie bars with pockets of melty candy corn baked into the batter. This simple, nostalgic dessert is perfect for Halloween parties and requires only pantry staples.
- Prep Time: 15 minutes
- Cook Time: 30-35 minutes
- Total Time: 45-50 minutes
- Yield: 16 servings 1x
- Category: Dessert
- Cuisine: American
Ingredients
- 1 cup (2 sticks) unsalted butter, softened
- 1 cup granulated sugar
- 1 cup dark brown sugar, packed
- 2 large eggs, room temperature
- 2 teaspoons pure vanilla extract
- 2 1/2 cups all-purpose flour
- 1 teaspoon baking powder
- 1/2 teaspoon salt
- 2 standard bags (10–12 ounces total) candy corn
Instructions
- Preheat oven to 350°F (175°C). Line a 9×13 inch baking pan with parchment paper, leaving an overhang on the long sides.
- In a large mixing bowl, cream together the softened butter, granulated sugar, and dark brown sugar until light and fluffy (about 3 minutes).
- Add the eggs and vanilla extract to the butter mixture. Beat on low speed just until combined.
- In a separate small bowl, whisk together the flour, baking powder, and salt.
- Gradually add the dry ingredients to the wet ingredients, mixing on low speed or folding gently with a spatula just until the flour disappears. Do not overmix.
- Pour in about 1.5 bags of candy corn and gently fold them into the batter. Reserve the remaining 0.5 bag for the top.
- Scrape the batter into the prepared pan and spread it evenly.
- Sprinkle the remaining candy corn evenly over the top of the batter and press lightly to adhere.
- Bake for 30-35 minutes, or until the edges are golden brown and the center is just set. A toothpick inserted into the center should come out with moist crumbs.
- Cool completely in the pan on a wire rack for at least 1 hour before lifting out and slicing into squares.
Notes
Do not overbake as blondies continue to cook in the pan. Use room temperature ingredients for best texture. Measure flour using the ‘spoon and level’ method to avoid dense blondies. For extra chew, add 1 tablespoon of cornstarch to the flour. Cool completely before cutting to prevent crumbling.
Nutrition
- Serving Size: 1 square
- Calories: 280
- Sugar: 32
- Sodium: 150
- Fat: 12
- Saturated Fat: 7
- Carbohydrates: 42
- Fiber: 1
- Protein: 3
Keywords: Halloween, blondies, candy corn, easy dessert, fall baking, party treats, nostalgic, 5-ingredient