Love this? Save it for later!
Share the inspiration with your friends
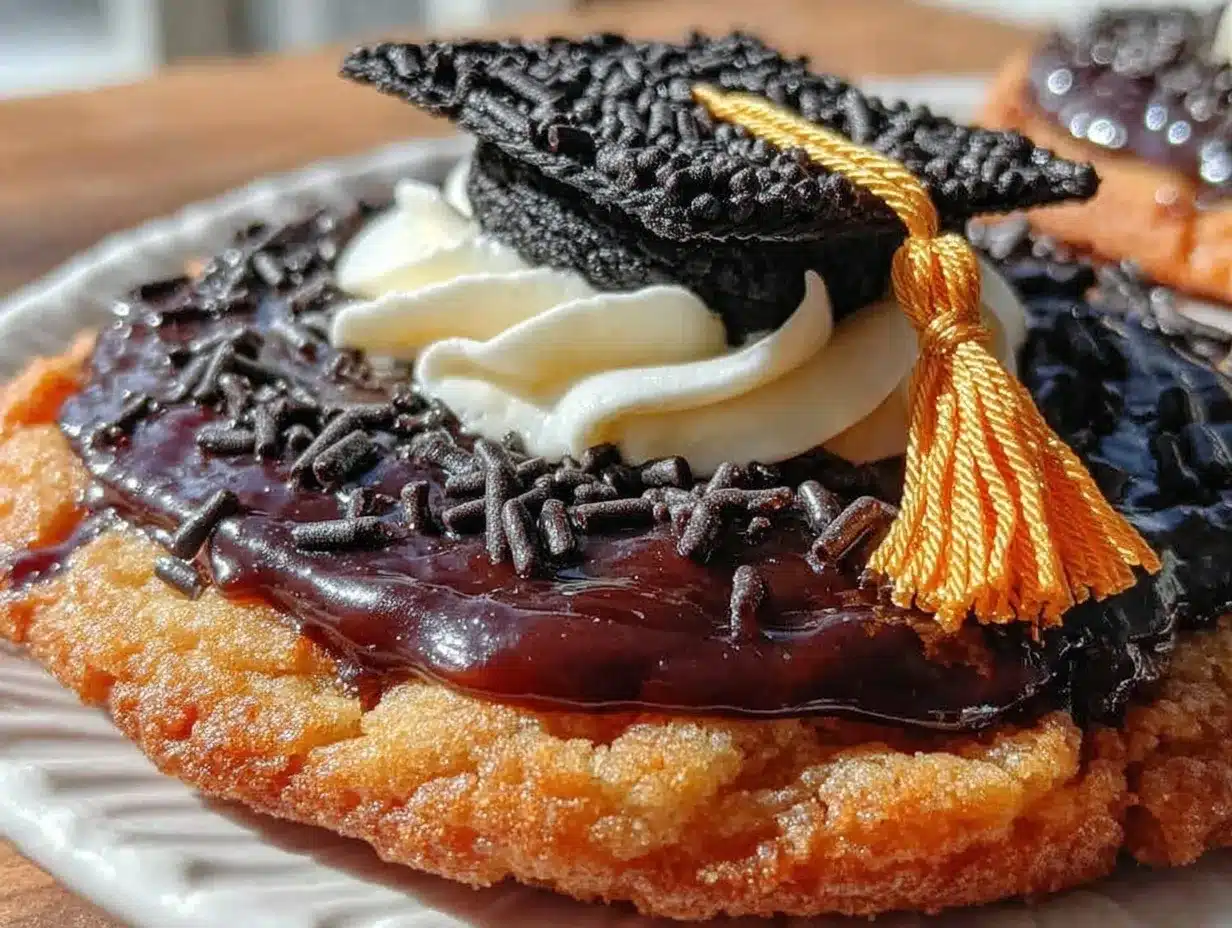
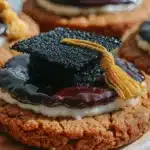
“I never thought a cookie cake could steal the show at a graduation party,” my friend Lisa confessed last spring, as we sat surrounded by half-eaten slices and sticky royal icing smudges on the tablecloth. It was graduation day for her nephew, Mike, and she’d taken a chance on baking a cookie cake instead of the usual tiered cake. Honestly, it wasn’t just any cookie cake—it had a meticulously decorated royal icing mortarboard on top, complete with a little tassel that looked almost too perfect to eat.
The story behind this perfect graduation cookie cake recipe started with that very celebration. I was there, scribbling down notes between bites, marveling at how something so simple felt so special. The way the cookie held its chewy, buttery texture while the royal icing added that crisp, sweet crunch was something I hadn’t expected. It wasn’t just dessert; it was a centerpiece, a conversation starter, and a memory-maker all rolled into one.
Maybe you’ve been there—stuck trying to find a graduation treat that’s festive but fun, impressive but not intimidating. This recipe is exactly that: easy enough for a home baker who’s juggling a million other things but with a wow factor that makes guests pause. And let me tell you, the little imperfections I made while piping the mortarboard only added character (plus, a bit of laughter). That’s why I keep coming back to this recipe—it’s real, approachable, and perfect for celebrating big moments in a sweet way.
Why You’ll Love This Recipe
After testing this perfect graduation cookie cake recipe dozens of times, I can confidently say it’s one you’ll want to bookmark for every milestone. Here’s why it stands out:
- Quick & Easy: You can whip up the cookie dough and royal icing in under two hours—ideal for last-minute party prep or spontaneous celebrations.
- Simple Ingredients: No exotic shopping trips here. The ingredients are pantry staples you probably already have, like butter, sugar, and eggs.
- Perfect for Celebrations: Whether it’s a graduation, birthday, or any proud moment, this cookie cake brings fun and festivity to your table.
- Crowd-Pleaser: It strikes the perfect balance between crunchy edges and a soft, chewy center—kids and adults alike keep reaching for seconds.
- Unbelievably Delicious: The buttery cookie base paired with the sweet, smooth royal icing mortarboard decoration creates a flavor and texture combo that feels like a celebration in every bite.
This cookie cake isn’t just a dessert; it’s a little showpiece with a personality. The royal icing technique I perfected gives you a clean, crisp mortarboard shape without needing to be a piping pro. The secret? A slightly thick, yet pipeable royal icing and a steady hand (or a little patience). Plus, the cake stores well, so you can prepare ahead and enjoy the party stress-free.
What Ingredients You Will Need
This perfect graduation cookie cake recipe uses simple, wholesome ingredients to deliver bold flavor and a satisfying texture without fuss. Most are pantry staples, and substitutions are easy if needed.
- For the Cookie Cake:
- 2 ½ cups (315g) all-purpose flour, sifted (King Arthur brand works great for consistent texture)
- 1 tsp baking powder
- ½ tsp baking soda
- ½ tsp salt
- 1 cup (225g) unsalted butter, softened (use European-style butter if possible for richness)
- 1 cup (200g) granulated sugar
- ½ cup (100g) packed light brown sugar (adds a subtle caramel note)
- 2 large eggs, room temperature
- 2 tsp vanilla extract (pure vanilla extract makes a difference)
- 1 cup (175g) semi-sweet chocolate chips or chunks (optional but highly recommended)
- For the Royal Icing Mortarboard Decoration:
- 3 large egg whites (or 6 tbsp pasteurized meringue powder mixed with water as per instructions)
- 4 cups (480g) powdered sugar, sifted (I prefer Domino for smooth consistency)
- 1 tsp lemon juice or vanilla extract (for flavor balance)
- Black gel food coloring (AmeriColor brand is vibrant and reliable)
- Optional: Yellow or gold gel food coloring for the tassel
Ingredient Tips: For a gluten-free option, swap the all-purpose flour with a 1-to-1 gluten-free baking flour blend. If you prefer a dairy-free version, use plant-based butter and ensure chocolate chips are dairy-free. Freshness counts here; make sure your eggs are fresh for a stable royal icing.
Equipment Needed
- Large mixing bowl and medium bowl for dry ingredients
- Electric hand mixer or stand mixer with paddle attachment (makes creaming butter and sugar effortless)
- Measuring cups and spoons (for precise baking)
- 9-inch (23cm) round cake pan or pizza pan lined with parchment paper (for shaping the cookie cake)
- Cooling rack (to cool the cookie cake evenly)
- Piping bags with small round tips (size #2 or #3 works well for detailed royal icing piping)
- Toothpicks or small offset spatula (for smoothing and fixing tiny icing details)
- Food-safe paintbrush (optional, for tassel detailing)
If you don’t have a stand mixer, a sturdy hand whisk and a bit of elbow grease will do for the royal icing, though it takes longer. For piping bags, you can use disposable ones or reusable silicone ones, whichever you prefer. Keeping your piping tips clean and dry between colors really helps with crisp lines. I once ended up with a smudged mortarboard after rushing this part—lesson learned!
Preparation Method
- Preheat and Prep: Preheat your oven to 350°F (175°C). Line your 9-inch round cake pan with parchment paper, letting some overhang for easy removal later. This step avoids any cookie cake sticking disasters.
- Mix Dry Ingredients: In a medium bowl, whisk together 2 ½ cups flour, 1 tsp baking powder, ½ tsp baking soda, and ½ tsp salt. Set aside.
- Cream Butter and Sugars: In a large bowl, beat 1 cup softened butter with 1 cup granulated sugar and ½ cup brown sugar until light and fluffy—about 3-4 minutes with an electric mixer. This step is where the cookie’s tender crumb begins taking shape.
- Add Eggs and Vanilla: Beat in 2 large eggs one at a time, then stir in 2 tsp vanilla extract. The batter should be smooth and shiny.
- Combine with Dry Ingredients: Gradually add the flour mixture to the butter mixture, mixing just until combined. Overmixing can make the cookie tough, so keep it gentle here.
- Fold in Chocolate Chips: Gently fold in 1 cup chocolate chips or chunks. You can skip this if you want a plain cookie cake or swap for nuts or dried fruit.
- Transfer and Shape: Spoon the dough into your prepared pan, spreading evenly with a spatula. Slightly press down to create a uniform thickness—about 1 inch (2.5 cm) thick.
- Bake: Bake at 350°F (175°C) for 25-30 minutes, until the edges turn golden and a toothpick inserted near the center comes out with a few moist crumbs. The center should remain softer—it firms up as it cools.
- Cool Completely: Let the cookie cake cool in the pan for 10 minutes, then lift out using the parchment paper and transfer to a cooling rack. Cooling is key before decorating; warm cookie means royal icing might melt or slide off.
- Prepare Royal Icing: Beat 3 large egg whites (or prepare meringue powder mixture) on medium speed until foamy. Gradually add 4 cups powdered sugar and 1 tsp lemon juice or vanilla extract, continuing to beat until stiff peaks form—about 7-10 minutes. Divide icing into two bowls.
- Color and Pipe Mortarboard: Tint one bowl of icing with black gel food coloring until deep black. Use this to pipe the square mortarboard shape on parchment paper or directly on the cookie cake once it’s completely cooled. For the tassel, tint a small amount of icing yellow or gold.
- Let the Icing Dry: Allow the royal icing to set completely, ideally for 4 hours or overnight, before slicing or transporting. This takes patience but delivers that crisp royal icing snap.
Pro Tip: If piping directly on the cookie cake, outline the mortarboard first, then flood the inside with thinner icing for smooth coverage. Use a toothpick to spread icing evenly and pop any air bubbles. Trust me, the first time I tried freehand piping, I ended up with a lopsided mortarboard—practice on parchment first!
Cooking Tips & Techniques
Making the perfect graduation cookie cake with royal icing decoration takes a few tricks up your sleeve. Here’s what I’ve learned:
- Butter Temperature Matters: Softened butter (not melted) is crucial for creaming with sugars. It traps air, making your cookie cake tender and fluffy. Too warm, and the cookie might spread too thin.
- Don’t Overmix Flour: Once you add the dry ingredients, mix just until combined. Overmixing develops gluten, creating a tougher texture, which you don’t want in a cookie cake.
- Use Fresh Eggs for Royal Icing: Fresh egg whites or high-quality meringue powder create a stable icing that dries hard and smooth. Older eggs can lead to runny icing that won’t hold shapes well.
- Practice Piping: If you’re new to royal icing piping, practice the mortarboard design on parchment paper first. It helps build confidence and steadies your hand.
- Consistency is Key: Your icing consistency should be thick enough to hold shape but thin enough to pipe smoothly. Adjust with a few drops of water or more powdered sugar as needed.
- Drying Time: Don’t rush the drying process. Let the royal icing set in a cool, dry place. Humidity can cause the icing to stay tacky longer.
- Multitasking: While your cookie cake bakes and cools, prepare the royal icing. It’s a great time saver and keeps the momentum going.
Variations & Adaptations
This recipe is flexible, so feel free to personalize it!
- Flavor Twists: Add a teaspoon of almond extract or orange zest to the cookie dough for a subtle flavor lift.
- Dietary Adaptations: Swap all-purpose flour for a gluten-free blend. Use dairy-free butter and vegan egg replacer for a vegan-friendly cookie cake.
- Alternative Decorations: Instead of a mortarboard, try piping a diploma scroll or the graduate’s initials in royal icing.
- Cooking Method: If you don’t have a round pan, shape the dough into a freehand rectangle on a baking sheet, then pipe the decoration accordingly.
- Personal Favorite: I once added chopped toasted pecans to the dough, which gave a lovely crunch that complimented the soft cookie and crisp icing perfectly.
Serving & Storage Suggestions
Serve this cookie cake at room temperature for the best texture and flavor. The royal icing’s crispness shines when the cookie isn’t chilled or warmed too much.
Pair it with a cold glass of milk or a cup of coffee for adults. It’s also a charming dessert alongside fresh fruit or a scoop of vanilla ice cream.
To store, wrap the cookie cake tightly in plastic wrap and keep it in an airtight container at room temperature for up to 3 days. For longer storage, freeze wrapped cookie cake for up to 1 month. Thaw overnight in the fridge before bringing to room temperature.
When reheating, avoid microwaving directly as it can soften the royal icing. Instead, warm very gently in a low oven (about 200°F or 90°C) for 5 minutes if needed. Flavors actually deepen after a day, making leftovers even more enjoyable.
Nutritional Information & Benefits
This perfect graduation cookie cake is a treat meant for celebration, so enjoy in moderation. Roughly, one slice (about 1/12th of the cake) contains around 300-350 calories, with 15-18g of fat and 35-40g of carbohydrates.
The butter provides vitamin A and some minerals, while eggs contribute protein and essential nutrients. Using real vanilla and fresh ingredients keeps it wholesome.
This recipe can be adapted for gluten-free or dairy-free diets, making it accessible to various dietary needs. Just be mindful of allergens like eggs and nuts if you add mix-ins.
Overall, it’s a joyful way to mark a milestone without overthinking nutrition—because sometimes, celebration is just as important as calories!
Conclusion
This perfect graduation cookie cake recipe brings a little magic to any celebration. It’s simple enough for busy home bakers but delivers a stunning, personalized touch with the royal icing mortarboard decoration. I love how it’s both nostalgic and modern—honestly, it captures that mix of excitement and pride perfectly.
Feel free to tweak the flavors, decorations, or ingredients to fit your style and taste. I’d love to hear how your cookie cake turns out or see your mortarboard designs! Leave a comment below sharing your experience or any fun twists you tried.
Go ahead, make that graduation moment extra sweet and memorable—with a cookie cake that’s as perfect as the accomplishment it celebrates.
FAQs
Can I make the cookie cake gluten-free?
Yes! Substitute the all-purpose flour with a 1-to-1 gluten-free baking flour blend. The texture might be slightly different but still delicious.
How long does royal icing take to dry?
Royal icing typically takes 4-6 hours to dry completely at room temperature. For best results, let it dry overnight in a cool, dry place.
Can I prepare the cookie cake and decorate it ahead of time?
Absolutely! Bake and cool the cookie cake a day in advance. Prepare royal icing and pipe the decorations the next day for fresh, crisp results.
What can I use if I don’t have meringue powder?
You can use fresh egg whites for the royal icing, but make sure they are pasteurized or very fresh for safety and stability.
How do I store leftover cookie cake?
Wrap leftovers tightly in plastic wrap and store at room temperature for up to 3 days or freeze for up to a month. Thaw before serving.
Pin This Recipe!
Perfect Graduation Cookie Cake Recipe Easy Royal Icing Mortarboard Tutorial
A festive and easy-to-make cookie cake decorated with a royal icing mortarboard, perfect for graduation celebrations. Combines a chewy, buttery cookie base with crisp, sweet royal icing for a memorable dessert centerpiece.
- Prep Time: 30 minutes
- Cook Time: 25-30 minutes
- Total Time: 4 hours 55 minutes to overnight (including icing drying time)
- Yield: 12 servings 1x
- Category: Dessert
- Cuisine: American
Ingredients
- 2 ½ cups (315g) all-purpose flour, sifted
- 1 tsp baking powder
- ½ tsp baking soda
- ½ tsp salt
- 1 cup (225g) unsalted butter, softened
- 1 cup (200g) granulated sugar
- ½ cup (100g) packed light brown sugar
- 2 large eggs, room temperature
- 2 tsp vanilla extract
- 1 cup (175g) semi-sweet chocolate chips or chunks (optional)
- 3 large egg whites (or 6 tbsp pasteurized meringue powder mixed with water)
- 4 cups (480g) powdered sugar, sifted
- 1 tsp lemon juice or vanilla extract
- Black gel food coloring
- Optional: Yellow or gold gel food coloring for the tassel
Instructions
- Preheat oven to 350°F (175°C). Line a 9-inch round cake pan with parchment paper, leaving some overhang.
- In a medium bowl, whisk together flour, baking powder, baking soda, and salt. Set aside.
- In a large bowl, beat softened butter with granulated sugar and brown sugar until light and fluffy, about 3-4 minutes.
- Beat in eggs one at a time, then stir in vanilla extract until smooth.
- Gradually add the dry ingredients to the butter mixture, mixing just until combined.
- Fold in chocolate chips or chunks if using.
- Spoon dough into prepared pan, spreading evenly and pressing down to about 1 inch thickness.
- Bake for 25-30 minutes until edges are golden and a toothpick inserted near the center comes out with a few moist crumbs.
- Cool cookie cake in pan for 10 minutes, then transfer to a cooling rack to cool completely.
- Prepare royal icing by beating egg whites (or meringue powder mixture) until foamy. Gradually add powdered sugar and lemon juice or vanilla extract, beating until stiff peaks form (7-10 minutes).
- Divide icing into two bowls. Tint one bowl black with gel food coloring for the mortarboard. Tint a small amount yellow or gold for the tassel if desired.
- Pipe the mortarboard shape on parchment paper or directly on the cooled cookie cake. Outline first, then flood inside with thinner icing. Use a toothpick to smooth and pop air bubbles.
- Allow royal icing to dry completely for 4 hours or overnight before slicing or transporting.
Notes
Use softened (not melted) butter for best texture. Do not overmix flour to avoid toughness. Practice piping on parchment paper before decorating the cake. Let royal icing dry completely in a cool, dry place to achieve a crisp finish. Store wrapped at room temperature up to 3 days or freeze up to 1 month.
Nutrition
- Serving Size: 1 slice (1/12th of t
- Calories: 325
- Sugar: 25
- Sodium: 150
- Fat: 16
- Saturated Fat: 9
- Carbohydrates: 38
- Fiber: 1
- Protein: 4
Keywords: graduation cookie cake, royal icing, mortarboard cookie cake, easy cookie cake, celebration dessert, chocolate chip cookie cake