Love this? Save it for later!
Share the inspiration with your friends
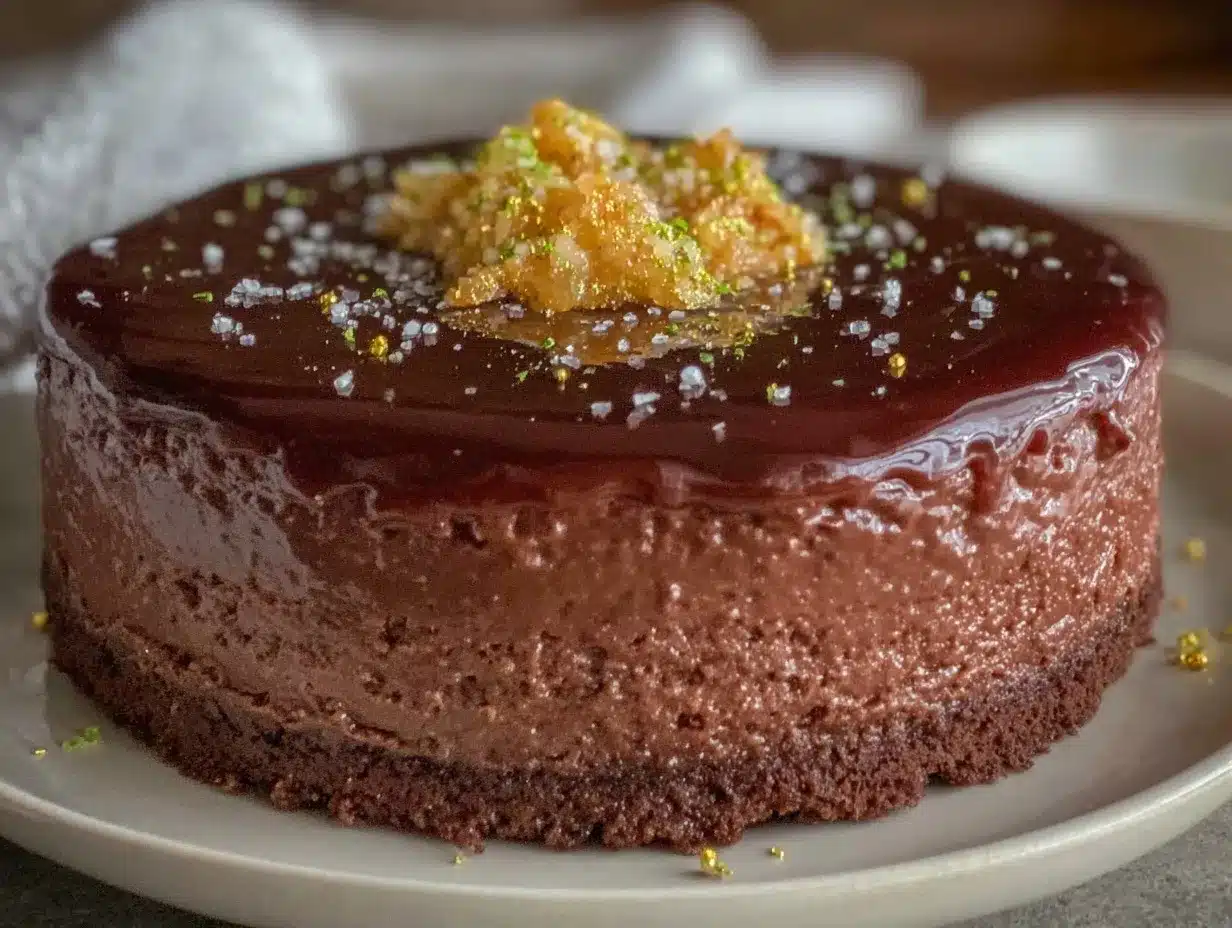
“It was the evening of a last-minute dinner party, and honestly, I hadn’t planned on making anything fancy. But the moment I saw that dull, ordinary chocolate cake sitting on the counter, I knew it had to go. So there I was, with a cracked mixing bowl and a slightly burnt saucepan, trying to whip up something that looked like it belonged in a patisserie window rather than my tiny kitchen. This perfect chocolate entremet with mirror glaze and gold leaf was born out of that chaotic, caffeine-fueled night—an accident that somehow turned into one of my proudest creations.”
Maybe you’ve been there too—scrambling to impress guests with whatever you have on hand. This recipe isn’t just about looking stunning (though, let’s be honest, that shiny mirror glaze and delicate gold leaf do steal the show). It’s about the rich, silky chocolate layers that melt in your mouth, the balance of textures, and the subtle hint of luxury that makes every bite feel like a celebration. And trust me, if I can pull this off in a kitchen full of distractions and missing a few tools, you can too.
Let me tell you, the first time I nailed this entremet, I felt like I had unlocked a secret pastry magician’s code. Since then, it’s become my go-to dessert for fancy gatherings, and I keep finding excuses to make it—because who can resist that glossy finish and the soft crackle of gold leaf on top? So, if you’re ready to take your chocolate game up a notch (without turning your kitchen into a disaster zone), let’s get to it!
Why You’ll Love This Recipe
From my many experiments and tweaks, this perfect chocolate entremet recipe has proven itself time and time again. It’s the kind of dessert that can make you look like a pro without needing a pastry degree. Here’s why it stands out:
- Quick & Easy: The steps are straightforward, coming together in about 3 hours including chilling time—ideal for prepping ahead or impressing guests without stress.
- Simple Ingredients: No obscure components here—just quality chocolate, cream, and a handful of pantry staples you probably already have waiting.
- Perfect for Special Occasions: Whether it’s a birthday, anniversary, or just a weekend treat, its elegant appearance and decadent flavor fit beautifully.
- Crowd-Pleaser: I’ve served this to friends who usually shy away from elaborate desserts, and they’re always coming back for seconds.
- Unbelievably Delicious: The smooth mousse layers combined with the shiny mirror glaze create a luxurious texture contrast that’s pure indulgence.
What really makes this recipe different? It’s the glaze technique—glossy and reflective without cracking—and the delicate touch of edible gold leaf that adds a wow factor. Plus, the mousse is rich yet light, thanks to the balance of chocolate and cream I perfected after a few too many trial runs (and plenty of taste tests!). This isn’t just any chocolate cake; it’s a dessert that makes you pause and savor each bite.
What Ingredients You Will Need
This recipe uses simple, wholesome ingredients to deliver bold flavor and satisfying texture without the fuss. Most are pantry staples, and where you can, I’ll suggest substitutions to fit your needs.
- For the Chocolate Mousse Layers:
- Dark chocolate (70% cocoa), finely chopped (I trust Valrhona for consistent richness)
- Heavy cream, cold (use dairy-free coconut cream if preferred)
- Granulated sugar (adds balanced sweetness)
- Gelatin sheets or powdered gelatin (for stability)
- Egg whites, room temperature (to add lightness)
- A pinch of salt (enhances chocolate flavor)
- For the Mirror Glaze:
- Sweetened condensed milk (adds shine and smoothness)
- White chocolate, chopped (for color and texture)
- Gelatin sheets or powder (to set the glaze)
- Water (to bloom the gelatin)
- Cocoa powder (for deep chocolate color)
- Optional: food-grade black or gold coloring to enhance the glaze depth
- Decoration:
- Edible gold leaf sheets (for that luxe finishing touch)
- Fresh berries or mint sprigs (optional for garnish)
Pro tip: When selecting chocolate, aim for one with a smooth, glossy finish to help your mousse and glaze shine. If you want to experiment, try adding a hint of espresso powder to the mousse for extra depth (I’ve done this on a rainy day, and it’s a game changer).
Equipment Needed
- Springform pan (8-inch/20 cm recommended) or silicone mold for easy release
- Mixing bowls (glass or stainless steel preferred for whipping cream and egg whites)
- Electric mixer or stand mixer (to get those perfect stiff peaks in the mousse)
- Small saucepan (for melting chocolate and preparing the mirror glaze)
- Thermometer (optional but helpful for precise glaze temperature)
- Spatula and whisk (for folding ingredients gently)
- Fine sieve or strainer (to ensure the glaze is perfectly smooth)
If you don’t have a springform pan, a silicone mold works wonders and makes unmolding a breeze. I once tried using a regular cake pan, and let me tell you, the stress of flipping it out was real! Also, a candy or instant-read thermometer helps keep the glaze at just the right warmth—too hot and it loses shine, too cool and it won’t spread smoothly.
Preparation Method
- Prepare the Gelatin: Soak gelatin sheets in cold water for 5-10 minutes until soft. If using powdered gelatin, sprinkle it over cold water and let it bloom. This step is key to that silky mousse texture.
- Make the Chocolate Mousse Base: Heat half of the heavy cream in a saucepan just until it simmers. Pour it over chopped dark chocolate in a bowl and let it sit for 2 minutes. Stir gently until smooth and glossy. Add bloomed gelatin to this chocolate mixture and stir until fully dissolved.
- Whip the Remaining Cream: In a separate bowl, whip the remaining heavy cream until soft peaks form. Set aside.
- Whip Egg Whites: Beat egg whites with a pinch of salt until soft peaks form. Gradually add granulated sugar and continue beating until stiff and glossy. This gives the mousse lift.
- Fold Ingredients: Gently fold the whipped cream into the chocolate mixture, then carefully fold in the egg whites. Take your time here—no rushing! The goal is a light, airy mousse.
- Assemble the Entremet: Pour half of the mousse into the prepared springform pan or mold, smooth the top, then refrigerate for 30 minutes to set slightly. Pour the remaining mousse on top and smooth again. Chill for 4 hours or overnight for best results.
- Prepare the Mirror Glaze: Soak gelatin as before. Heat sweetened condensed milk, cocoa powder, and water in a saucepan until just simmering. Remove from heat, add bloomed gelatin, and stir until dissolved. Pour the hot mixture over chopped white chocolate, wait 2 minutes, then whisk until smooth.
- Glaze the Entremet: Let the glaze cool to around 90°F (32°C)—it should be warm but not hot. Place entremet on a rack over a tray and pour the glaze evenly over the top, letting it drip down the sides. Use a spatula to smooth if needed.
- Decorate: Carefully apply edible gold leaf with a clean, dry brush or tweezers while the glaze is still tacky. Add fresh berries or mint if desired.
- Chill and Serve: Refrigerate the glazed entremet for at least 1 hour before slicing. Use a hot knife (dip in warm water and dry) for clean cuts.
During the process, I once forgot to chill the mousse long enough, and the glaze didn’t set properly—lesson learned! Patience really pays off here. Also, watching that mirror glaze cascade down the sides is oddly satisfying and totally worth the wait.
Cooking Tips & Techniques
Working with mirror glaze and mousse can feel intimidating, but a few tricks make it easier:
- Temperature Control: The mirror glaze must be the right temperature (around 90°F/32°C) to spread smoothly without melting the mousse. A kitchen thermometer is your best friend here.
- Gelatin Blooming: Always soak gelatin in cold water first; if you skip this, you’ll end up with lumps or a runny mousse.
- Folding Technique: When combining whipped cream and egg whites into chocolate, fold gently with a spatula using a lifting motion. This keeps the mousse airy.
- Glaze Pouring Setup: Place your entremet on a wire rack with a tray underneath to catch drips—makes cleanup way easier.
- Knife Warm-Up: For slicing, dip your knife in hot water and wipe dry between cuts to keep edges smooth and shiny.
I once tried rushing the mousse assembly and ended up with a dense texture—lesson learned the hard way! Also, multitasking by prepping the glaze while the mousse chills saves time and keeps your workflow smooth.
Variations & Adaptations
This chocolate entremet recipe is a fantastic base for playing around. Here are a few ideas I’ve tried or recommend:
- Fruit Infusion: Add a layer of raspberry or passion fruit puree between mousse layers for a tangy contrast. I once used homemade blackberry coulis and it was divine.
- Dairy-Free Option: Substitute heavy cream with full-fat coconut cream and use dairy-free chocolate. The texture shifts slightly but remains lush and satisfying.
- Nutty Twist: Incorporate a crunchy hazelnut praline base or sprinkle toasted almonds in the layers for textural surprise.
- Different Chocolate Types: Try milk chocolate for a sweeter, creamier entremet or white chocolate with a hint of lemon zest for brightness.
- Glaze Colors: Use natural coloring or cocoa powder to customize the mirror glaze shade—deep ruby red or emerald green can be show-stoppers for themed events.
For a quick change-up, swapping out the dark chocolate for a spiced chocolate blend (think cinnamon or chili) adds warmth and excitement. One time, I added cardamom to the mousse, and guests were intrigued—definitely worth a try if you like a little adventure!
Serving & Storage Suggestions
This entremet is best served chilled, straight from the fridge, at around 50-55°F (10-13°C). The mousse is creamy but firm, and the glaze shines brightest at this temperature.
Pair it with fresh berries or a dollop of whipped cream for added freshness. A bold coffee or a smooth dessert wine complements the rich chocolate beautifully.
Store leftovers in an airtight container in the refrigerator for up to 3 days. To freeze, wrap tightly with plastic wrap and foil; thaw overnight in the fridge before glazing or serving.
Reheating isn’t recommended as it can affect texture. However, if the glaze dulls, a quick spray of a neutral oil can bring back some shine. The flavors develop and deepen after a day, so sometimes it tastes even better the next day.
Nutritional Information & Benefits
Per serving (assuming 8 servings), this chocolate entremet provides approximately:
| Calories | 380 |
|---|---|
| Fat | 28g |
| Carbohydrates | 30g |
| Protein | 5g |
| Sugar | 25g |
The dark chocolate used offers antioxidants and may support heart health in moderation. The gelatin adds a bit of protein and supports joint and skin health. This dessert is naturally gluten-free, but always check labels to avoid cross-contamination.
From a personal wellness perspective, I love that this recipe balances indulgence with relatively simple, whole ingredients—no artificial stabilizers or additives. It’s a treat that feels thoughtful and rewarding.
Conclusion
This perfect chocolate entremet with mirror glaze and gold leaf isn’t just a dessert; it’s a statement. It stands out for its stunning appearance, luxurious texture, and surprisingly manageable process. Whether you’re hosting a special occasion or just craving something extraordinary, this recipe is ready to impress.
Feel free to tweak it based on your taste and ingredient availability—remember, cooking is as much about creativity as precision. Personally, I keep coming back to this recipe because it’s that rare combination of glamour and comfort, and it always brings smiles at the table.
Give it a try, share your results, or tell me about your own twists in the comments—I love hearing how recipes come to life in your kitchens. Happy baking, and here’s to many shiny, chocolatey moments ahead!
Frequently Asked Questions
- Can I make the entremet a day ahead? Yes! In fact, chilling it overnight helps the mousse set perfectly and makes glazing easier.
- What if I don’t have edible gold leaf? No worries! The entremet still looks beautiful with just the mirror glaze or you can garnish with fresh fruit.
- Can I use powdered gelatin instead of sheets? Absolutely. Use about 1 teaspoon powdered gelatin per sheet and bloom it in cold water before adding.
- How do I store leftovers? Keep them refrigerated in an airtight container for up to 3 days. Avoid freezing after glazing as it can dull the shine.
- Is this recipe suitable for beginners? While it requires some patience, the steps are straightforward and perfect for anyone wanting to learn pastry basics with a wow factor.
Pin This Recipe!
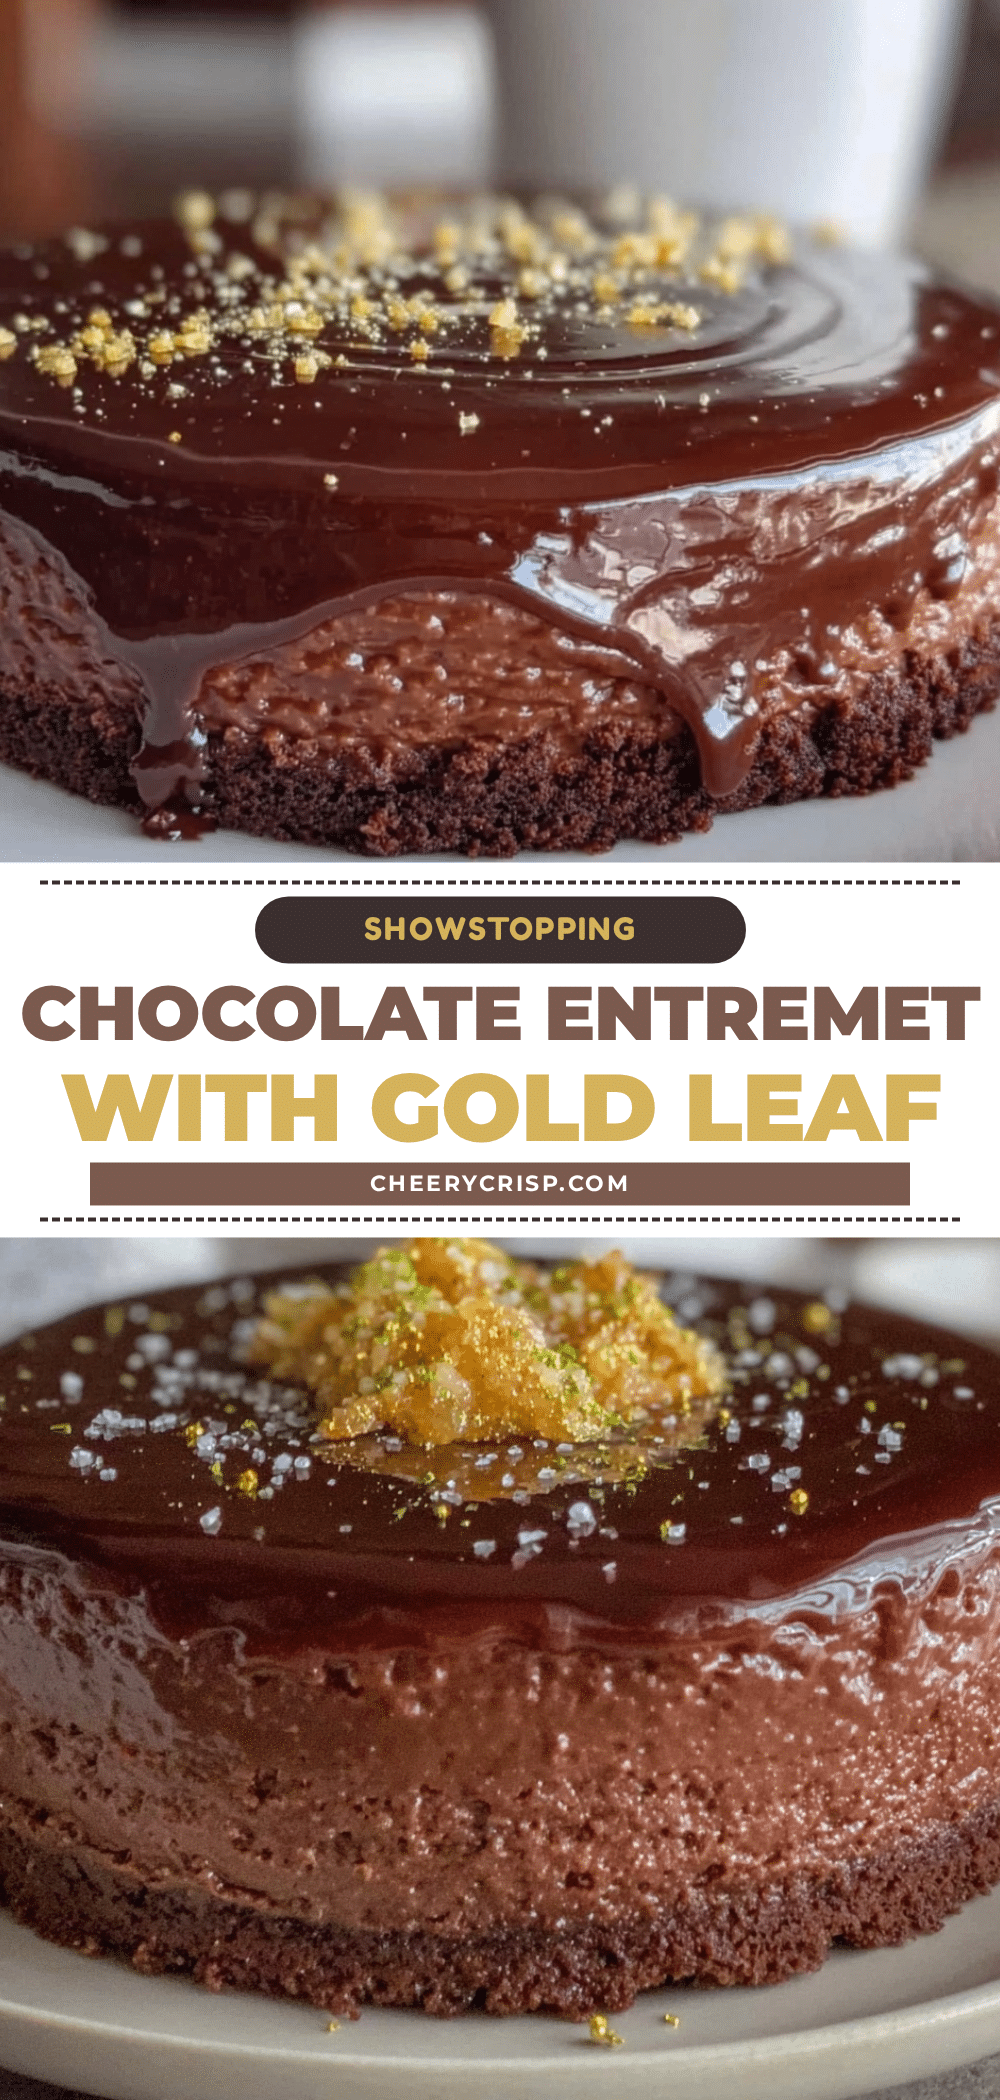
Perfect Chocolate Entremet Recipe with Mirror Glaze and Gold Leaf Tutorial
A luxurious chocolate entremet featuring rich mousse layers, a glossy mirror glaze, and delicate edible gold leaf, perfect for special occasions and impressive desserts.
- Prep Time: 45 minutes
- Cook Time: 15 minutes
- Total Time: 3 hours
- Yield: 8 servings
- Category: Dessert
- Cuisine: French
Ingredients
- Dark chocolate (70% cocoa), finely chopped
- Heavy cream, cold (or dairy-free coconut cream as substitute)
- Granulated sugar
- Gelatin sheets or powdered gelatin
- Egg whites, room temperature
- A pinch of salt
- Sweetened condensed milk
- White chocolate, chopped
- Water
- Cocoa powder
- Optional: food-grade black or gold coloring
- Edible gold leaf sheets
- Fresh berries or mint sprigs (optional for garnish)
Instructions
- Soak gelatin sheets in cold water for 5-10 minutes until soft. If using powdered gelatin, sprinkle over cold water and let bloom.
- Heat half of the heavy cream in a saucepan until just simmering. Pour over chopped dark chocolate and let sit for 2 minutes. Stir until smooth and glossy. Add bloomed gelatin and stir until dissolved.
- Whip the remaining heavy cream until soft peaks form and set aside.
- Beat egg whites with a pinch of salt until soft peaks form. Gradually add granulated sugar and beat until stiff and glossy.
- Gently fold whipped cream into the chocolate mixture, then fold in the egg whites carefully to keep mousse airy.
- Pour half the mousse into a prepared 8-inch springform pan or silicone mold, smooth the top, and refrigerate for 30 minutes to set slightly.
- Pour remaining mousse on top, smooth again, and chill for 4 hours or overnight.
- Prepare the mirror glaze by soaking gelatin as before. Heat sweetened condensed milk, cocoa powder, and water until just simmering. Remove from heat, add bloomed gelatin, and stir until dissolved.
- Pour hot mixture over chopped white chocolate, wait 2 minutes, then whisk until smooth.
- Cool glaze to about 90°F (32°C). Place entremet on a rack over a tray and pour glaze evenly over top, letting it drip down sides. Smooth with spatula if needed.
- Apply edible gold leaf carefully with a clean dry brush or tweezers while glaze is tacky. Garnish with fresh berries or mint if desired.
- Refrigerate glazed entremet for at least 1 hour before slicing. Use a hot knife (dip in warm water and dry) for clean cuts.
Notes
Ensure gelatin is properly bloomed to avoid lumps. Keep mirror glaze at about 90°F (32°C) for best shine and smooth spreading. Use a hot knife for clean slices. Chilling overnight improves mousse set and glaze application. If glaze dulls, a quick spray of neutral oil can restore shine.
Nutrition
- Serving Size: 1 slice (1/8 of entr
- Calories: 380
- Sugar: 25
- Fat: 28
- Carbohydrates: 30
- Protein: 5
Keywords: chocolate entremet, mirror glaze, gold leaf, chocolate mousse, elegant dessert, special occasion dessert, gluten-free dessert