Love this? Save it for later!
Share the inspiration with your friends
“I never thought a spilled bag of panko crumbs could lead to one of my favorite dinners,” I confessed to my friend as we laughed over the mess in my tiny kitchen last Thursday night. Honestly, that’s how my Crispy Chicken Katsu Curry with Rich Japanese Sauce was born. I was halfway through making a simple chicken dinner when the bag of panko slipped off the counter, scattering golden crumbs everywhere. Instead of stressing, I grabbed a fresh chicken breast, dipped it in egg, and went all-in on those crumbs. The sizzle when the chicken hit the hot oil was music to my ears, and the aroma that filled the air was just the beginning of what would become a new obsession.
You know that feeling when a recipe surprises you? This one absolutely did. It wasn’t some fancy restaurant trick or a complicated ingredient list — just a humble, crispy chicken cutlet paired with a sauce so rich and comforting it felt like a warm hug on a rainy day. The Japanese curry sauce, thick and savory, was something I’d tasted years ago at a little hole-in-the-wall spot in the city, but replicating it at home? That was a challenge I didn’t expect to crack so quickly. There was a moment when I almost gave up, thinking a jarred sauce would have to do, but I stuck with it, and boy, am I glad I did.
Maybe you’ve been there — craving something hearty, a little crispy, and full of flavor but tired of takeout that never quite hits the spot. This Crispy Chicken Katsu Curry recipe is my go-to for those nights when I want impressive comfort food without the fuss. Plus, it’s got that addictive crunch and a sauce that’s rich without being overwhelming. Let me tell you, once you try this, it’s going to stay on your weekly menu too.
Why You’ll Love This Recipe
This Crispy Chicken Katsu Curry isn’t your average dinner — it’s a dish I’ve tweaked and tested until it felt just right. I’m sharing it with you because it hits all the marks for a satisfying meal that’s surprisingly easy to pull off.
- Quick & Easy: Ready in about 40 minutes, perfect for busy weeknights or impromptu dinner plans.
- Simple Ingredients: Nothing fancy here — just chicken breasts, panko, and pantry staples for the sauce.
- Perfect for Cozy Dinners: The rich Japanese sauce brings warmth and depth that’s ideal for chilly evenings or when you want something comforting.
- Crowd-Pleaser: Kids and adults alike can’t get enough of the crispy texture paired with that creamy, flavorful curry.
- Unbelievably Delicious: The contrast between crunchy chicken and smooth, savory sauce is pure magic.
What sets this recipe apart is the homemade Japanese curry sauce — thick, with just the right balance of sweetness and spice — and the panko coating that crisps up unbelievably well without being greasy. I’ve tried a bunch of shortcuts in the past, but making the sauce from scratch really changed the game. It’s like comfort food with a little twist of authenticity you won’t find in a jar.
This dish doesn’t just fill you up; it makes you pause, savor, and maybe even close your eyes after that first bite. It’s comfort food done right, the kind that feels special but never complicated.
What Ingredients You Will Need
This Crispy Chicken Katsu Curry recipe uses straightforward ingredients that come together to create bold flavors and satisfying textures. Most of these are pantry staples or easy to find at any grocery store.
For the Chicken Katsu
- Chicken breasts (2 large, boneless and skinless) – pounded to even thickness for perfect cooking
- Panko breadcrumbs (1 ½ cups) – I prefer Kikkoman brand for that extra crunch
- All-purpose flour (½ cup) – for dredging
- Large eggs (2, beaten) – helps the panko stick perfectly
- Salt and black pepper – to season the chicken and the flour
- Vegetable oil (for frying) – neutral oil like canola works best
For the Japanese Curry Sauce
- Unsalted butter (2 tablespoons) – adds richness to the roux
- All-purpose flour (3 tablespoons) – to thicken the sauce
- Grated onion (1 medium) – for natural sweetness
- Garlic (2 cloves, minced) – aromatic base
- Grated ginger (1 teaspoon) – subtle warmth
- Chicken broth (2 cups / 480 ml) – preferably low sodium
- Grated carrot (1 small) – adds texture and sweetness
- Grated apple (½ medium, Fuji or Gala recommended) – classic Japanese curry touch
- Soy sauce (1 tablespoon) – for umami depth
- Worcestershire sauce (1 tablespoon) – tangy complexity
- Honey (1 teaspoon) – balances acidity
- Curry powder (2 tablespoons) – I use S&B brand for authentic flavor
- Garlic powder (½ teaspoon) – complements fresh garlic
- Ground black pepper (to taste)
Substitution notes: For gluten-free, swap regular flour with rice flour or a gluten-free blend. If dairy-free, use coconut oil instead of butter and coconut milk in place of some broth for extra creaminess.
Equipment Needed
- Meat mallet or rolling pin: To pound the chicken breasts evenly. If you don’t have one, a heavy skillet works fine.
- Shallow bowls or plates: For flour, egg wash, and panko breadcrumbs – helps with easy dredging.
- Large skillet or frying pan: A nonstick or cast iron pan works best for frying the chicken to crispy perfection.
- Whisk: For making the curry sauce roux smoothly without lumps.
- Grater: To grate onion, carrot, and apple for the sauce – a box grater or microplane both work.
- Wooden spoon or heatproof spatula: For stirring the sauce gently while it thickens.
- Thermometer (optional): To check oil temperature; aim for around 350°F (175°C) to get that perfect crisp.
Personally, I’ve found a cast iron skillet gives a more even crust on the chicken, but a good nonstick pan does the job, especially if you’re mindful of the oil temperature. If you’re tight on budget, kitchen tongs can replace a thermometer for careful flipping and oil control.
Preparation Method
- Pound the chicken: Place the chicken breasts between two sheets of plastic wrap and pound gently with a meat mallet or rolling pin until about ½ inch (1.3 cm) thick. This helps them cook evenly and stay juicy. (5 minutes)
- Season and set up dredging stations: Season both sides of the chicken with salt and pepper. Place flour in one shallow bowl, beaten eggs in another, and panko breadcrumbs in a third. This assembly line makes the breading process smooth and fast. (5 minutes)
- Bread the chicken: Dredge each breast first in flour, shaking off excess, then dip into the egg wash, and finally press into the panko breadcrumbs until fully coated. Don’t rush this step; pressing the panko firmly helps achieve that ultra-crispy texture. (10 minutes)
- Heat the oil: Pour vegetable oil to about ½ inch (1.3 cm) depth in a large skillet and heat over medium-high heat. When the oil shimmers or a breadcrumb dropped into it sizzles immediately, it’s ready for frying. (5 minutes)
- Fry the chicken: Carefully place the breaded chicken breasts into the hot oil. Fry about 3-4 minutes per side until golden brown and crispy. Avoid overcrowding the pan to keep the oil temperature steady. Use tongs to flip gently. (8 minutes)
- Drain and rest: Transfer the cooked chicken to a wire rack or paper towels to drain excess oil. Resting for a few minutes helps the crust stay crisp. (5 minutes)
- Prepare the Japanese curry sauce: In a separate saucepan, melt butter over medium heat. Add grated onion, garlic, and ginger, stirring until softened and fragrant, about 3 minutes.
- Make the roux: Sprinkle in the flour and stir constantly for 2-3 minutes, until it turns a light golden color. This step cooks out the raw flour taste and thickens the sauce nicely.
- Add liquids and flavorings: Slowly whisk in chicken broth to avoid lumps. Stir in grated carrot, apple, soy sauce, Worcestershire sauce, honey, curry powder, garlic powder, and black pepper.
- Simmer: Reduce heat to low and let the sauce simmer gently, stirring occasionally, for about 15 minutes until thickened and glossy. Taste and adjust seasoning if needed. (15 minutes)
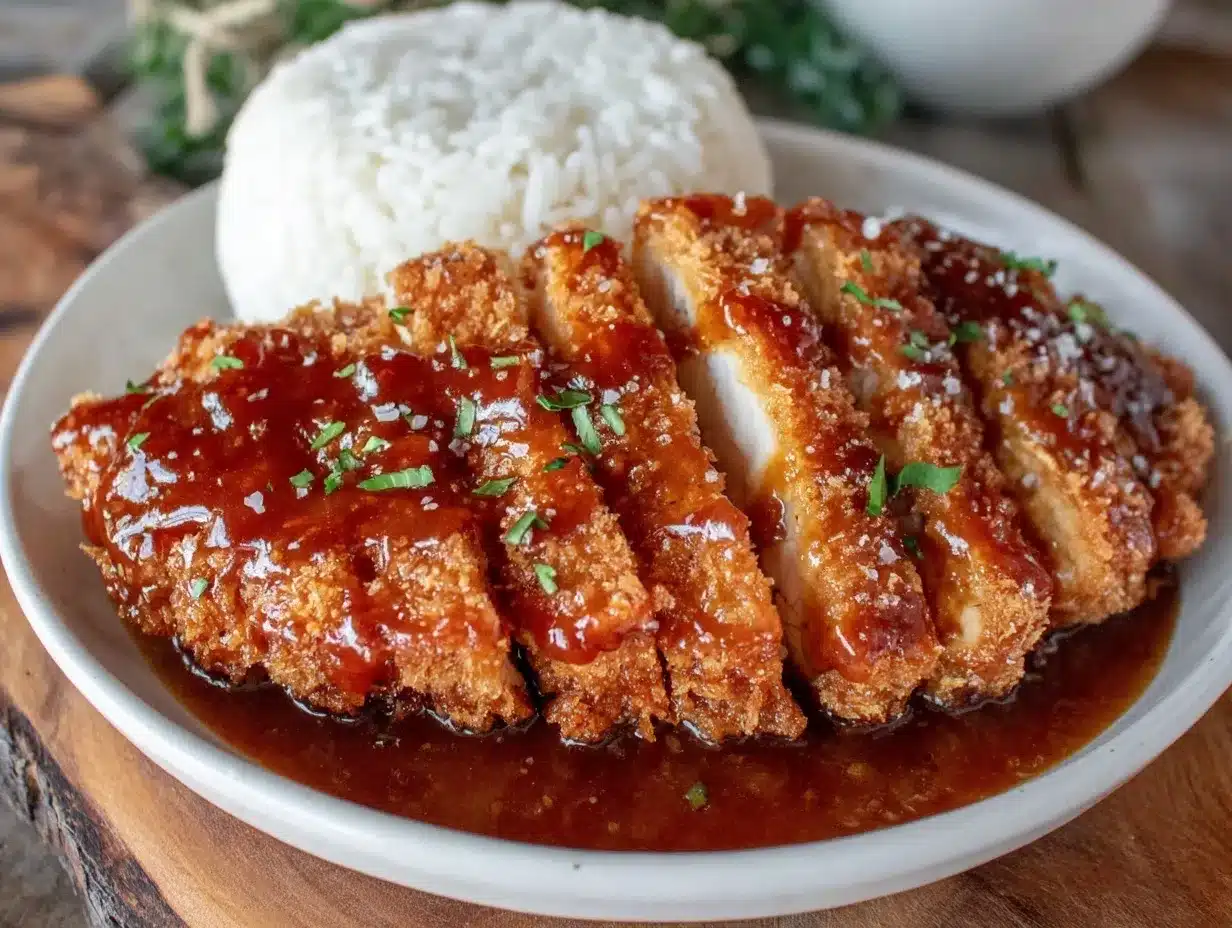
- Slice and serve: Slice the crispy chicken katsu into strips and serve over steamed rice with a generous ladle of the rich Japanese curry sauce poured on top.
Tip: If the sauce becomes too thick, whisk in a splash of broth or water to loosen it up just before serving.
Cooking Tips & Techniques
Let me share some of the tricks I learned the hard way making this Crispy Chicken Katsu Curry:
- Keep the oil temperature steady: Too hot, and the crust will burn before the chicken cooks through; too cool, and it absorbs too much oil and gets soggy. Using a thermometer helps, but if you don’t have one, test with a small breadcrumb—it should sizzle right away but not brown instantly.
- Press panko firmly: Lightly coating with panko won’t give you that iconic crunch. Pressing it firmly into the egg wash helps it stick well and creates a thick, crispy crust.
- Don’t overcrowd the pan: Fry in batches if needed. Crowding lowers oil temperature and leads to uneven frying.
- Make the roux carefully: Stir the flour into the melted butter constantly to avoid lumps and raw taste.
- Grate your aromatics: Grated onion, carrot, and apple dissolve into the sauce, adding natural sweetness and body without chunky bits.
- Rest the chicken: Letting the chicken rest for a few minutes after frying keeps the crust crispy and the meat juicy.
Honestly, the first time I tried skipping the pressing step on the panko, the crust fell apart halfway through eating — lesson learned! Also, multitasking by making the sauce while frying chicken saves time and keeps everything warm and ready to serve.
Variations & Adaptations
This Crispy Chicken Katsu Curry recipe is versatile and easy to tweak depending on your mood or dietary needs.
- Vegetarian version: Swap chicken for thick slices of fried tofu or eggplant, breaded and fried the same way. The sauce remains the star.
- Spicy kick: Add a teaspoon of cayenne pepper or a splash of hot sauce to the curry sauce for a subtle heat that wakes up the flavors.
- Gluten-free option: Use rice flour for dredging and gluten-free panko breadcrumbs. The sauce thickens beautifully with cornstarch slurry if you skip the flour roux.
- Seasonal twist: In fall, try adding a bit of pumpkin puree into the curry sauce for richness and a hint of sweetness.
- Personal favorite: I once added a spoonful of miso paste to the sauce for an umami boost — it was unexpected but totally delicious.
Serving & Storage Suggestions
Serve your Crispy Chicken Katsu Curry hot over steamed white rice or even fluffy Japanese short-grain rice for authenticity. A side of pickled vegetables or a simple green salad with sesame dressing complements the richness nicely.
For storing, keep the chicken and sauce separate in airtight containers in the refrigerator for up to 3 days. Reheat the sauce gently on the stove, adding a splash of broth if it thickens too much. Reheat the chicken in a toaster oven or oven at 350°F (175°C) for about 10 minutes to maintain crispiness — microwaving tends to make it soggy.
Leftovers often taste even better the next day, as the curry sauce flavors deepen. Just remember to re-crisp that chicken for the best experience.
Nutritional Information & Benefits
This Crispy Chicken Katsu Curry offers a balanced meal with protein from the chicken, vitamins from the grated vegetables and apple, and complex flavors without excess fat. A typical serving provides approximately 550-600 calories, with moderate carbs and protein around 40 grams per serving.
The ingredients like ginger and garlic have natural anti-inflammatory properties, and using homemade sauce means you avoid preservatives and excess sodium found in pre-made sauces. For those watching carbs, serving with cauliflower rice is a tasty low-carb alternative that still pairs beautifully with the curry sauce.
Just a heads up: this recipe contains gluten and soy, so it’s not suitable for those with allergies to these ingredients unless substitutions are made.
Conclusion
Making Crispy Chicken Katsu Curry with Rich Japanese Sauce at home is not only doable but rewarding. It satisfies that craving for something crunchy, saucy, and full of comfort without complicated steps or long ingredient lists. I love how this recipe manages to be both nostalgic and fresh, perfect for those nights when you want a little taste of Japan right in your own kitchen.
Feel free to adjust the spice level, swap ingredients, or add your own twist — that’s what keeps this recipe exciting for me. If you give it a try, I’d love to hear how you made it your own or any fun mishaps you encountered along the way. Let this recipe be the start of many cozy dinners and happy cooking memories.
Trust me, once you get the hang of this, Crispy Chicken Katsu Curry will become one of your reliable favorites too.
FAQs
What is the best way to keep the chicken katsu crispy after frying?
Place the fried chicken on a wire rack instead of paper towels to drain. This prevents steam from softening the crust. Also, avoid stacking or covering it while warm.
Can I make the Japanese curry sauce ahead of time?
Absolutely! The sauce tastes even better after sitting overnight. Store in the fridge and gently reheat before serving, stirring occasionally.
What can I use instead of panko breadcrumbs?
If you don’t have panko, crushed cornflakes or regular breadcrumbs can work, but the texture won’t be quite as light and crispy.
Is it possible to bake the chicken katsu instead of frying?
Yes, bake breaded chicken at 425°F (220°C) on a wire rack for about 20 minutes, flipping halfway. It won’t be quite as crispy but still delicious and less oily.
How do I make this recipe gluten-free?
Use gluten-free panko or crushed rice crackers, substitute flour with rice flour or cornstarch, and check that soy sauce is gluten-free or use tamari.
For a classic crispy garlic chicken twist, try adding garlic powder to the panko mix. Or, if you enjoy rich sauces, you might appreciate the depth in this slow-cooked beef ragu that shares the same cozy vibes as this katsu curry.
PrintCrispy Chicken Katsu Curry Recipe Easy Homemade Japanese Sauce

A crispy chicken cutlet paired with a rich and comforting homemade Japanese curry sauce, perfect for cozy dinners and busy weeknights.
- Prep Time: 25 minutes
- Cook Time: 15 minutes
- Total Time: 40 minutes
- Yield: 2 servings 1x
- Category: Main Course
- Cuisine: Japanese
Ingredients
- 2 large boneless, skinless chicken breasts, pounded to even thickness
- 1 ½ cups panko breadcrumbs
- ½ cup all-purpose flour
- 2 large eggs, beaten
- Salt and black pepper, to season
- Vegetable oil for frying (neutral oil like canola)
- 2 tablespoons unsalted butter
- 3 tablespoons all-purpose flour
- 1 medium grated onion
- 2 cloves garlic, minced
- 1 teaspoon grated ginger
- 2 cups (480 ml) chicken broth, preferably low sodium
- 1 small grated carrot
- ½ medium grated apple (Fuji or Gala recommended)
- 1 tablespoon soy sauce
- 1 tablespoon Worcestershire sauce
- 1 teaspoon honey
- 2 tablespoons curry powder
- ½ teaspoon garlic powder
- Ground black pepper to taste
Instructions
- Place the chicken breasts between two sheets of plastic wrap and pound gently with a meat mallet or rolling pin until about ½ inch (1.3 cm) thick. (5 minutes)
- Season both sides of the chicken with salt and pepper. Set up dredging stations with flour in one shallow bowl, beaten eggs in another, and panko breadcrumbs in a third. (5 minutes)
- Dredge each chicken breast first in flour, shaking off excess, then dip into the egg wash, and press firmly into the panko breadcrumbs until fully coated. (10 minutes)
- Pour vegetable oil to about ½ inch (1.3 cm) depth in a large skillet and heat over medium-high heat until shimmering or a breadcrumb sizzles immediately. (5 minutes)
- Carefully place the breaded chicken breasts into the hot oil and fry about 3-4 minutes per side until golden brown and crispy. Avoid overcrowding the pan. (8 minutes)
- Transfer the cooked chicken to a wire rack or paper towels to drain excess oil and rest for a few minutes to keep the crust crisp. (5 minutes)
- In a separate saucepan, melt butter over medium heat. Add grated onion, garlic, and ginger, stirring until softened and fragrant, about 3 minutes.
- Sprinkle in the flour and stir constantly for 2-3 minutes until light golden to make the roux.
- Slowly whisk in chicken broth to avoid lumps. Stir in grated carrot, apple, soy sauce, Worcestershire sauce, honey, curry powder, garlic powder, and black pepper.
- Reduce heat to low and simmer gently, stirring occasionally, for about 15 minutes until thickened and glossy. Taste and adjust seasoning if needed. (15 minutes)
- Slice the crispy chicken katsu into strips and serve over steamed rice with a generous ladle of the Japanese curry sauce poured on top.
Notes
Keep oil temperature steady around 350°F (175°C) to avoid burning or sogginess. Press panko firmly for a thick, crispy crust. Avoid overcrowding the pan when frying. Rest chicken after frying to maintain crispiness. If sauce is too thick, whisk in a splash of broth or water before serving. For gluten-free, substitute flour and panko with rice flour and gluten-free panko. For dairy-free, use coconut oil instead of butter and coconut milk in place of some broth.
Nutrition
- Serving Size: 1 chicken breast wit
- Calories: 575
- Sugar: 8
- Sodium: 600
- Fat: 25
- Saturated Fat: 7
- Carbohydrates: 45
- Fiber: 4
- Protein: 40
Keywords: chicken katsu, Japanese curry, crispy chicken, homemade curry sauce, comfort food, easy dinner, panko chicken