Love this? Save it for later!
Share the inspiration with your friends
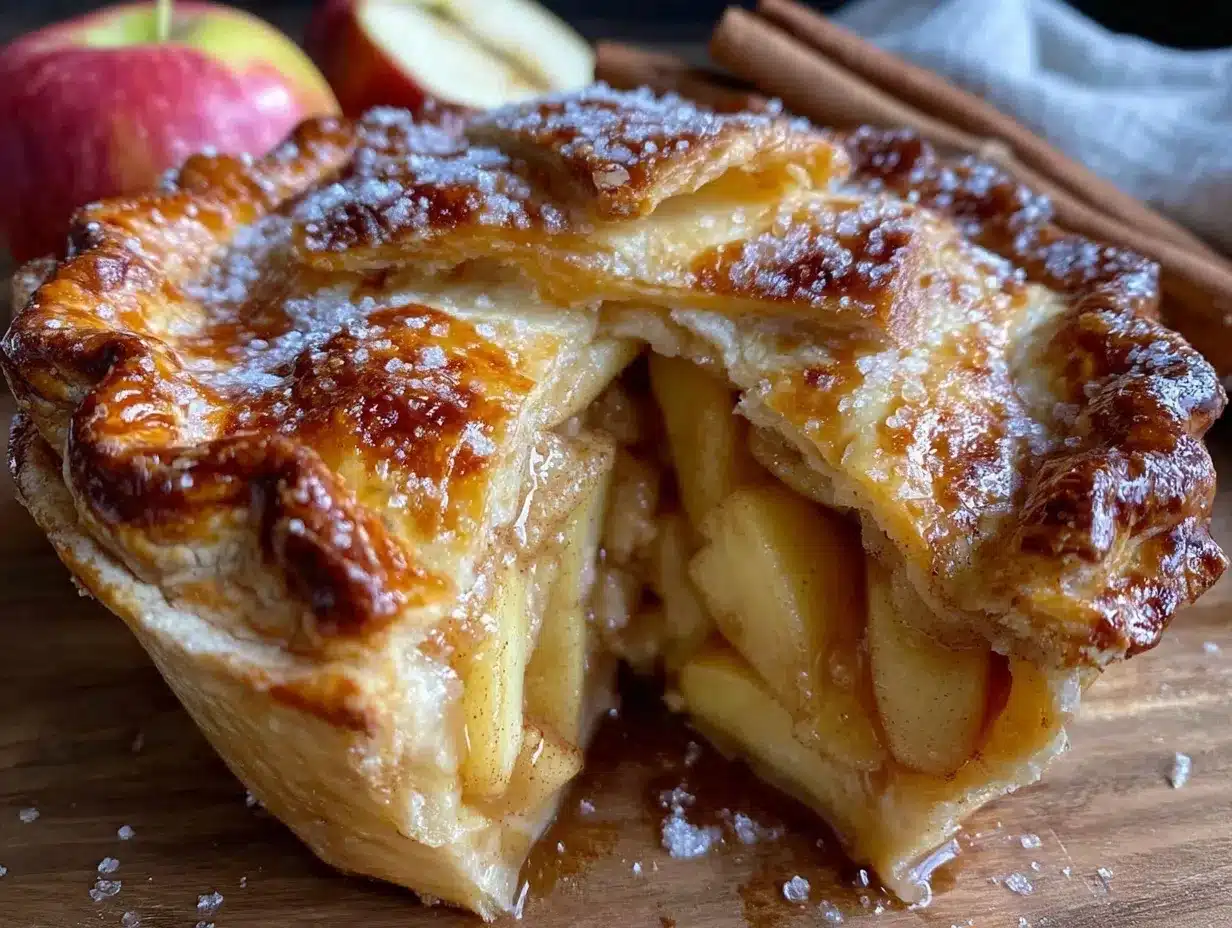
“I never thought I’d be the type to bake a pie,” I confessed to my friend last October, standing in my cluttered kitchen with apple peels scattered all over the counter. Honestly, I was convinced that apple pie was some kind of culinary Everest—too complicated, too fiddly, and frankly, a little scary. But then, on a chilly Sunday morning, armed with a cracked mixing bowl and a stubborn rolling pin, I set out to try an easy classic apple pie recipe for beginners. Maybe you’ve been there too—standing in front of a mound of apples wondering if you can really pull this off without turning the kitchen into a disaster zone.
What happened next surprised me. This recipe, simple and straight-up approachable, didn’t just turn out edible—it became my go-to comfort food that I now make whenever I want to impress without stress. The sweet-tart filling bubbling under a flaky, golden crust felt like a warm hug on a plate, and the best part? I didn’t have to be a pro baker to get it right. I remember burning a little edge (because I got distracted by a phone call), but it only added character. And that first bite? It brought back memories of cozy fall afternoons and laughter-filled family dinners, even though this pie was made in my tiny apartment, miles away from any fancy bakery.
So, if you’re someone who’s always wanted to try making an apple pie but felt intimidated by endless steps or fancy ingredients, this recipe is for you. Let me tell you, it’s straightforward, forgiving, and honestly, downright delicious. That’s why this easy classic apple pie recipe for beginners has stayed with me—and why I keep coming back to it, slice after slice.
Why You’ll Love This Recipe
After testing many apple pie recipes over the years—some too complicated, others lacking flavor—I’m confident this one strikes the perfect balance. I’ve baked it for quick weeknight desserts, last-minute potlucks, and lazy Sunday afternoons, and it never disappoints.
- Quick & Easy: Comes together in about 45 minutes plus baking, perfect when you want homemade pie without fuss.
- Simple Ingredients: Uses pantry staples and fresh apples you can find anywhere—no need for fancy or hard-to-find items.
- Perfect for Beginners: Clear, step-by-step instructions with forgiving methods make it ideal if you’re new to baking.
- Crowd-Pleaser: Family, friends, even picky eaters—everyone seems to love this classic flavor combo.
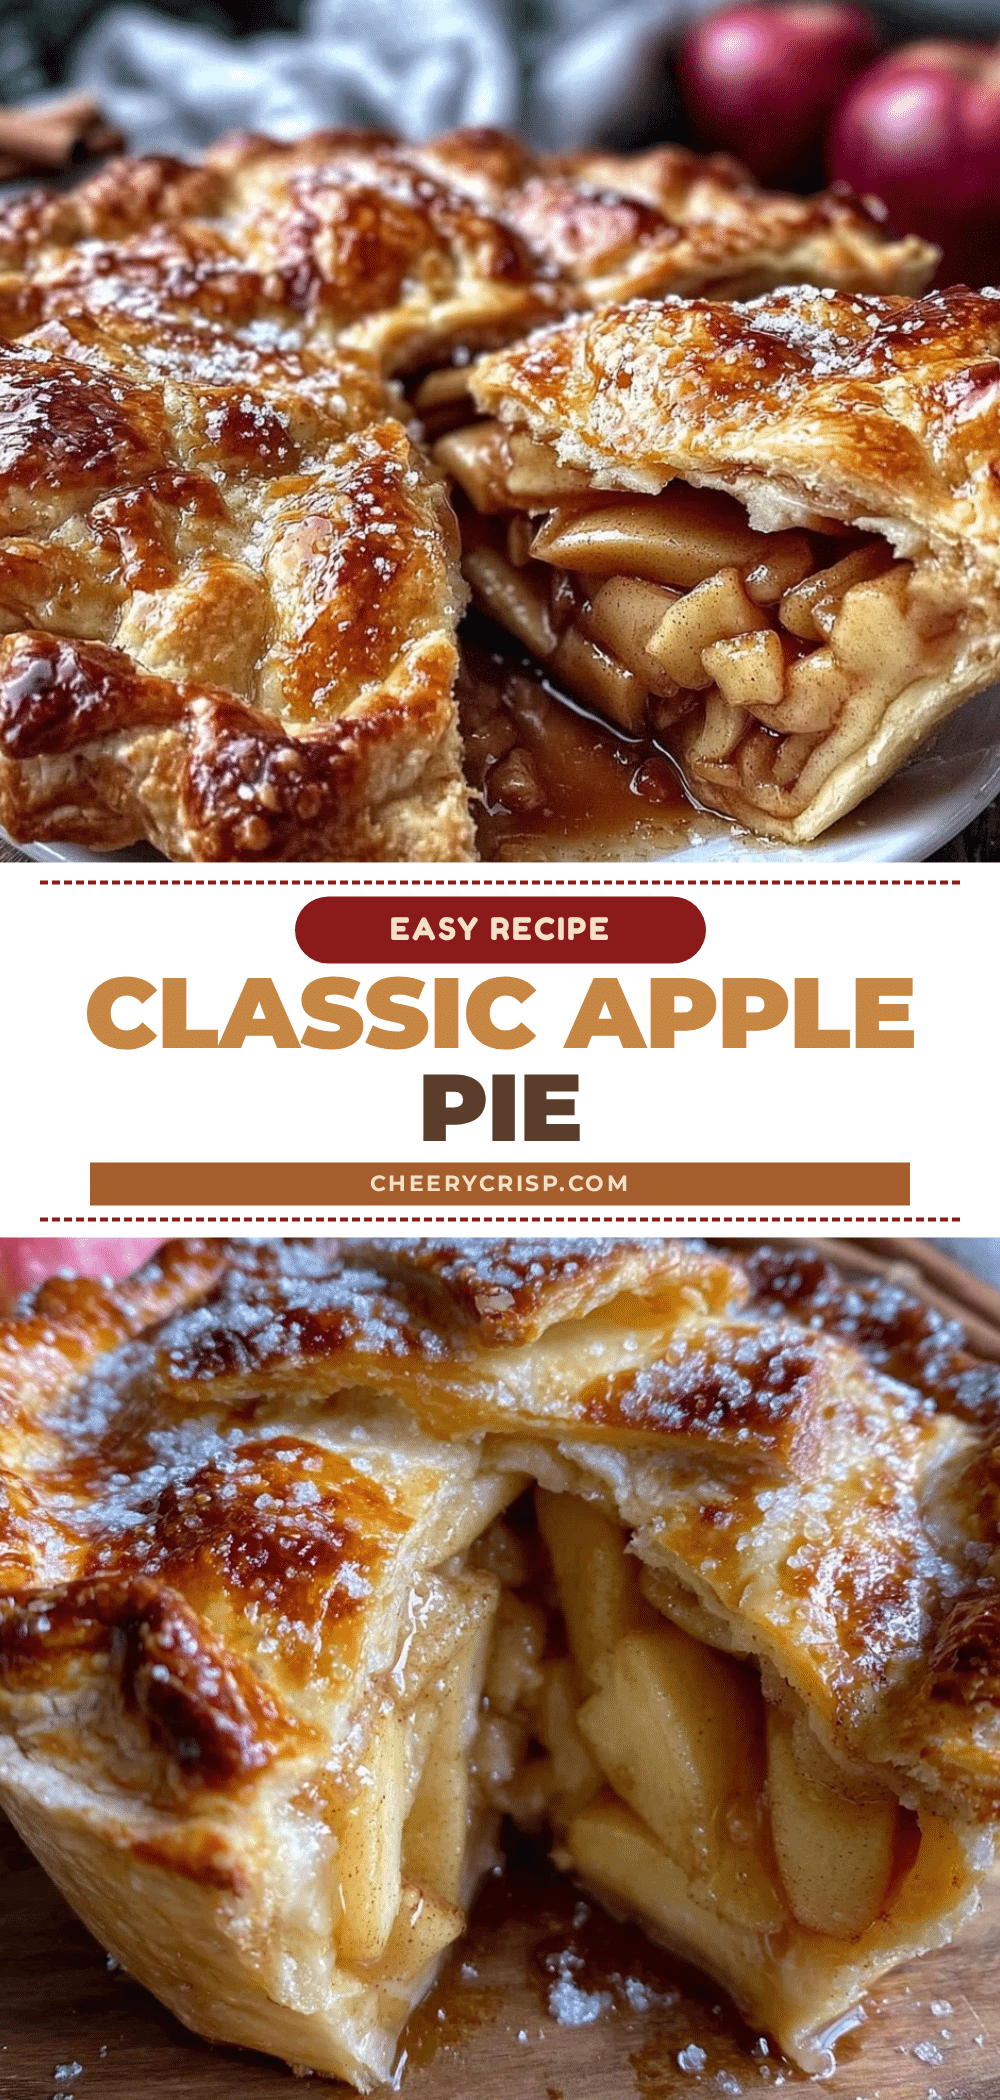
- Unbelievably Delicious: The juicy cinnamon-spiced filling paired with flaky crust creates a texture and taste that feels like a warm, familiar hug.
What sets this recipe apart? The crust is made with a simple butter-and-shortening blend that stays tender but holds up well, no soggy bottom here. Plus, the filling uses a mix of tart and sweet apples to achieve that perfect balance of flavor and texture. Honestly, it’s a recipe I trust and recommend when you want a perfectly simple homemade pie that tastes like it took hours, but really didn’t.
What Ingredients You Will Need
This recipe uses straightforward, wholesome ingredients to create a classic apple pie that’s as tasty as it is accessible. Most of these are pantry staples or easy to find at any grocery store.
- For the crust:
- 2 ½ cups (315g) all-purpose flour, plus extra for dusting (I like King Arthur for consistent results)
- ½ teaspoon salt
- 1 cup (226g) unsalted butter, cold and cubed (using high-quality butter really makes a difference here)
- ¼ cup (50g) vegetable shortening, cold (helps with flakiness and texture)
- 6-8 tablespoons ice-cold water
- For the filling:
- 6 cups (about 6 medium) apples, peeled, cored, and sliced (a mix of Granny Smith and Fuji works well for both tartness and sweetness)
- ¾ cup (150g) granulated sugar
- ¼ cup (50g) brown sugar, packed
- 2 tablespoons all-purpose flour (helps thicken the filling)
- 1 teaspoon ground cinnamon
- ¼ teaspoon ground nutmeg
- 1 tablespoon lemon juice (prevents browning and adds brightness)
- 1 teaspoon vanilla extract (optional but adds warmth)
- 1 tablespoon unsalted butter, cut into small pieces (to dot on top of filling before adding crust)
- For the egg wash:
- 1 large egg, beaten
- 1 tablespoon water
If you need to swap ingredients, you can use almond flour for a gluten-free crust (though texture will differ) or coconut oil instead of butter for a dairy-free version. For apples, adjust based on seasonality—Honeycrisp or Braeburn are tasty alternatives. I’ve tried this with organic apples from my local farmers market, and the flavor really shines through.
Equipment Needed
- 9-inch (23cm) pie dish – glass or ceramic works best for even baking.
- Mixing bowls – at least two, one for crust, one for filling.
- Rolling pin – a sturdy rolling pin makes shaping the crust much easier. If you don’t have one, a clean wine bottle works in a pinch (been there!).
- Pastry cutter or two forks – to cut butter into flour for the crust (or your fingers, if you’re brave).
- Sharp knife or apple corer – to prep the apples quickly and neatly.
- Baking sheet – to place under the pie to catch any drips.
- Pastry brush – for applying the egg wash evenly.
If you don’t have a pastry cutter, I’ve found that cold butter and shortening can be mashed together quickly with two forks or even chopped finely with a knife before mixing with flour. For rolling, chilling the dough for at least 30 minutes before working with it makes it less sticky and easier to handle. Budget-wise, you can get a decent rolling pin and pie dish for under $20 total at most stores, which is a small investment for all the delicious pies you’ll make!
Preparation Method
- Make the crust dough: In a large bowl, whisk together 2 ½ cups flour and ½ teaspoon salt. Add the cold, cubed butter and shortening. Using a pastry cutter or two forks, cut the fats into the flour until the mixture resembles coarse crumbs with pea-sized pieces. Don’t overwork it—some larger bits create flakiness. (About 5 minutes)
- Add ice water gradually: Sprinkle 6 tablespoons of ice-cold water over the mixture and gently mix with a fork. Add more water, 1 tablespoon at a time, until the dough just comes together when pressed. It should be moist but not sticky. (2-3 minutes)
- Divide and chill: Form the dough into two discs, wrap in plastic wrap, and refrigerate for at least 30 minutes. Chilling helps relax the gluten and firms up the fats for flaky crust. (30 minutes or longer)
- Prepare the filling: While dough chills, combine sliced apples, granulated sugar, brown sugar, flour, cinnamon, nutmeg, lemon juice, and vanilla extract in a large bowl. Toss gently to coat apples evenly. (10 minutes)
- Roll out bottom crust: On a lightly floured surface, roll one dough disc into a 12-inch (30cm) circle, about ⅛ inch thick. Carefully transfer to a 9-inch pie dish by rolling the dough onto the rolling pin and unrolling it over the dish. (10 minutes)
- Add filling and dot with butter: Pour the apple mixture into the crust, spreading evenly. Dot the top with small pieces of butter to add richness as it bakes. (5 minutes)
- Roll out top crust: Roll the second dough disc into a 12-inch circle. You can do a full cover or cut strips for a lattice top if you’re feeling fancy. Place over filling, trimming any excess dough, and crimp edges to seal. (10-15 minutes)
- Apply egg wash: Mix the beaten egg with water and brush the top crust to achieve a beautiful golden finish. (2 minutes)
- Cut vents: If using a full top crust, cut small slits in the center to allow steam to escape during baking. (2 minutes)
- Bake: Place the pie on a baking sheet and bake in a preheated 425°F (220°C) oven for 15 minutes. Reduce temperature to 350°F (175°C) and bake for another 35-40 minutes until crust is golden and filling bubbles. (Total baking time: 50-55 minutes)
- Cool: Let the pie cool on a wire rack for at least 2 hours before slicing to allow the filling to set properly. (2 hours)
Quick tip: If the crust edges brown too fast, cover them with foil halfway through baking to prevent burning. Also, watch for bubbling filling—that’s a good sign the pie is cooking through. In my experience, rushing the cooling step leads to runny slices, so patience here pays off.
Cooking Tips & Techniques
Making a perfect apple pie crust might feel intimidating, but a few tricks can make it much easier—and tastier.
- Keep everything cold: Butter and shortening should be ice-cold to create flaky layers. Chill your mixing bowl and utensils if you can—it helps! I once skipped chilling and ended up with a tough crust; lesson learned.
- Don’t overwork the dough: Mixing too much develops gluten, making the crust chewy instead of tender. Stop once the dough holds together.
- Use a mix of apples: Combining tart Granny Smith with sweeter Fuji or Gala gives a balanced flavor and texture.
- Roll evenly: Try to keep the dough about ⅛ inch thick for even baking. Thicker edges can burn or stay doughy inside.
- Vent the top crust well: Steam escaping prevents sogginess and keeps your pie from overflowing.
- Let the pie cool: I know waiting is hard, but cutting too soon can make a mess. The filling needs time to thicken.
- Multitasking tip: While the pie bakes, you can tidy up or prepare a simple vanilla ice cream to serve alongside—trust me, it’s a game-changer.
Variations & Adaptations
Even with a classic recipe like this, there’s room to play around based on what you like or have on hand.
- Gluten-free crust: Swap all-purpose flour for a gluten-free blend, and add a tablespoon of xanthan gum to help with structure.
- Spiced twist: Add a pinch of ground cloves or cardamom for a warm, fragrant flavor that’s perfect for holiday gatherings.
- Rustic open-face pie: Skip the top crust and fold the edges over the filling for a simpler, less fussy look.
- Vegan adaptation: Use coconut oil instead of butter and a flax egg (1 tablespoon ground flaxseed + 3 tablespoons water) for the egg wash.
- Personal favorite: I’ve tried adding chopped toasted pecans right on top of the filling before covering with dough—it adds a lovely crunch and nutty flavor.
Serving & Storage Suggestions
This apple pie is best served slightly warm or at room temperature—just the way I like it with a scoop of vanilla ice cream or a dollop of whipped cream. The contrast between the flaky crust and the soft, cinnamon-spiced apples is irresistible.
To store, wrap leftover pie tightly in plastic wrap or foil and keep it in the refrigerator for up to 4 days. You can also freeze the pie whole or by slices for up to 2 months—just thaw overnight in the fridge before reheating.
Reheating works best in a 350°F (175°C) oven for about 15-20 minutes to restore that freshly baked texture. Microwave reheating is faster but can make the crust a bit soggy.
One little secret: flavors deepen after a day, so if you can wait, it tastes even better the next day. You know that feeling when leftovers somehow taste like a treat? That’s this pie, honestly.
Nutritional Information & Benefits
An average slice (1/8 of the pie) contains approximately 320 calories, 45g carbohydrates, 4g protein, 15g fat, and 3g fiber. This recipe uses fresh apples packed with vitamin C and dietary fiber, which aid digestion and add natural sweetness.
Using butter and shortening in moderation provides richness and texture, but you can adjust fats or swap for healthier oils if you prefer. This pie is naturally free of artificial additives and can be made gluten-free or vegan with simple substitutions.
For those mindful of sugar, try reducing the granulated sugar by ¼ cup or swapping in coconut sugar. The balance of tart and sweet apples helps keep the filling flavorful without overwhelming sweetness.
Conclusion
This easy classic apple pie recipe for beginners is proof that homemade pie doesn’t have to be intimidating or complicated. With simple ingredients, straightforward steps, and a little patience, you’ll end up with a dessert that tastes like it came from a cozy kitchen filled with love.
Feel free to tweak the spices, try different apples, or experiment with crust variations to make it your own. I love how this recipe brings a little joy and comfort every time I bake it—maybe it will do the same for you.
If you give it a try, I’d love to hear how it goes! Drop a comment, share your tips, or let me know your favorite apple pie twist. Happy baking, and remember—there’s something truly special about making a pie from scratch, no matter your skill level.
FAQs
What’s the best type of apple for apple pie?
Using a mix of tart and sweet apples works best. Granny Smith adds tartness and firmness, while Fuji or Gala brings sweetness and softness. This combo keeps the filling flavorful and balanced.
Can I make the pie crust ahead of time?
Yes! You can prepare the crust dough up to 2 days in advance. Keep it wrapped tightly in the fridge. This actually helps the dough rest and can improve the texture.
How do I prevent a soggy bottom crust?
Using flour in the filling helps absorb excess moisture. Also, baking the pie on a lower oven rack and using a preheated baking sheet underneath can help crisp the crust bottom.
Can I use frozen apples for the filling?
Fresh apples are best for texture, but if you use frozen, thaw and drain them well to avoid a watery filling. You might need to add a bit more flour or thickener.
How long does apple pie keep after baking?
Store apple pie covered in the refrigerator for up to 4 days. For longer storage, freeze wrapped pie or slices for up to 2 months. Reheat in the oven for best results.
Pin This Recipe!
Easy Classic Apple Pie Recipe for Beginners Perfectly Simple Homemade Pie

A straightforward and forgiving apple pie recipe perfect for beginners, featuring a flaky butter-and-shortening crust and a sweet-tart cinnamon-spiced apple filling.
- Prep Time: 45 minutes
- Cook Time: 50-55 minutes
- Total Time: 3 hours 35 minutes
- Yield: 8 servings 1x
- Category: Dessert
- Cuisine: American
Ingredients
- 2 ½ cups (315g) all-purpose flour, plus extra for dusting
- ½ teaspoon salt
- 1 cup (226g) unsalted butter, cold and cubed
- ¼ cup (50g) vegetable shortening, cold
- 6–8 tablespoons ice-cold water
- 6 cups (about 6 medium) apples, peeled, cored, and sliced (mix of Granny Smith and Fuji)
- ¾ cup (150g) granulated sugar
- ¼ cup (50g) brown sugar, packed
- 2 tablespoons all-purpose flour
- 1 teaspoon ground cinnamon
- ¼ teaspoon ground nutmeg
- 1 tablespoon lemon juice
- 1 teaspoon vanilla extract (optional)
- 1 tablespoon unsalted butter, cut into small pieces
- 1 large egg, beaten
- 1 tablespoon water
Instructions
- In a large bowl, whisk together 2 ½ cups flour and ½ teaspoon salt. Add the cold, cubed butter and shortening. Using a pastry cutter or two forks, cut the fats into the flour until the mixture resembles coarse crumbs with pea-sized pieces. Don’t overwork it.
- Sprinkle 6 tablespoons of ice-cold water over the mixture and gently mix with a fork. Add more water, 1 tablespoon at a time, until the dough just comes together when pressed. It should be moist but not sticky.
- Form the dough into two discs, wrap in plastic wrap, and refrigerate for at least 30 minutes.
- While dough chills, combine sliced apples, granulated sugar, brown sugar, flour, cinnamon, nutmeg, lemon juice, and vanilla extract in a large bowl. Toss gently to coat apples evenly.
- On a lightly floured surface, roll one dough disc into a 12-inch circle, about ⅛ inch thick. Carefully transfer to a 9-inch pie dish by rolling the dough onto the rolling pin and unrolling it over the dish.
- Pour the apple mixture into the crust, spreading evenly. Dot the top with small pieces of butter.
- Roll the second dough disc into a 12-inch circle. Place over filling, trimming any excess dough, and crimp edges to seal. Optionally, cut strips for a lattice top.
- Mix the beaten egg with water and brush the top crust to achieve a golden finish.
- If using a full top crust, cut small slits in the center to allow steam to escape.
- Place the pie on a baking sheet and bake in a preheated 425°F oven for 15 minutes. Reduce temperature to 350°F and bake for another 35-40 minutes until crust is golden and filling bubbles.
- Let the pie cool on a wire rack for at least 2 hours before slicing.
Notes
Keep butter and shortening ice-cold for flaky crust. Chill dough for at least 30 minutes before rolling. Cover crust edges with foil if browning too fast. Let pie cool for at least 2 hours before slicing to allow filling to set. Use a mix of tart and sweet apples for balanced flavor. For gluten-free crust, substitute flour with gluten-free blend and add xanthan gum. For vegan version, use coconut oil and flax egg.
Nutrition
- Serving Size: 1 slice (1/8 of pie)
- Calories: 320
- Fat: 15
- Carbohydrates: 45
- Fiber: 3
- Protein: 4
Keywords: apple pie, classic apple pie, easy apple pie, homemade pie, beginner baking, fall dessert, cinnamon apple pie