Love this? Save it for later!
Share the inspiration with your friends
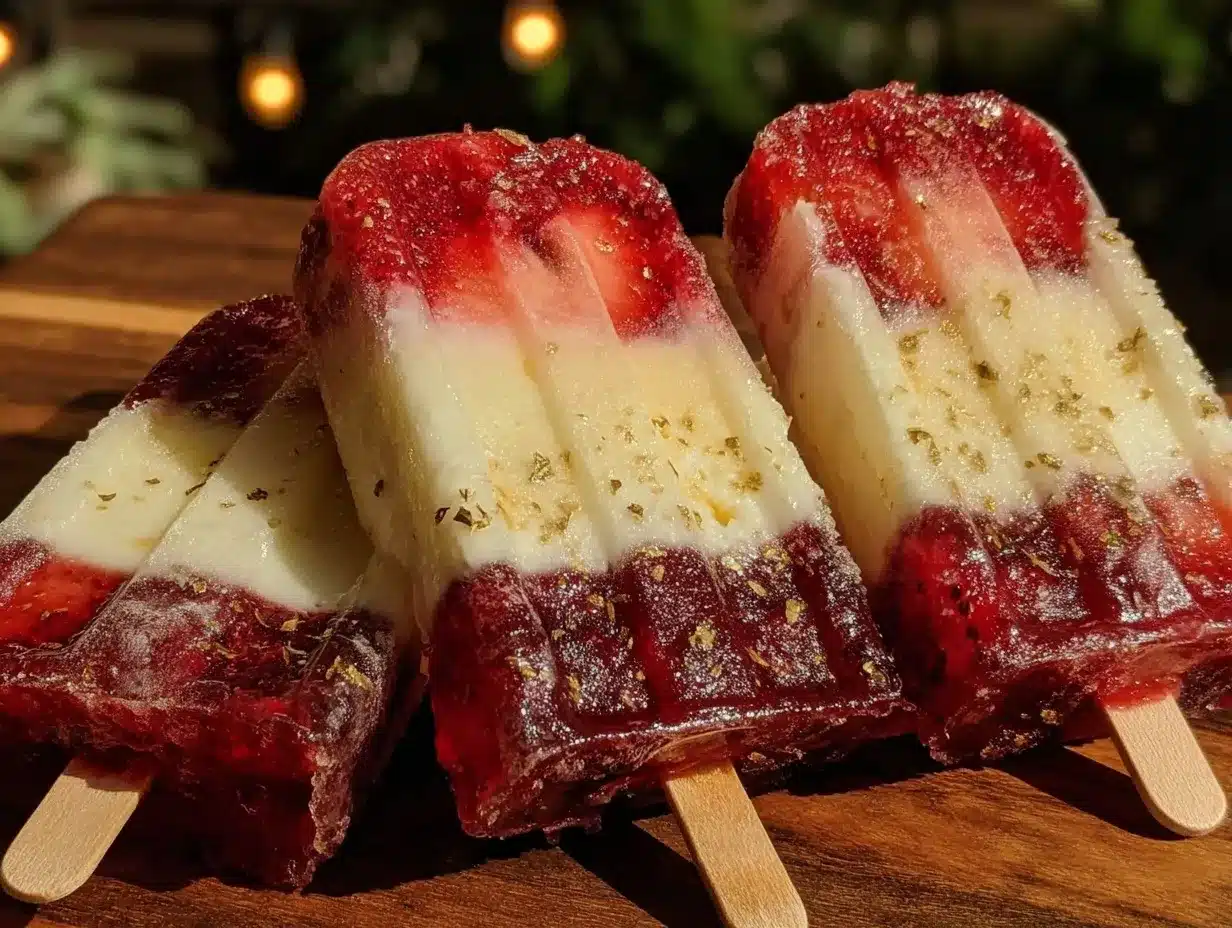
“You know that moment when a sudden heatwave hits, and you realize you’ve got nothing but freezer-burned ice cubes and a desperate craving for something cool and festive? That was me last July Fourth afternoon. I was halfway through setting up the picnic in the blazing sun at my friend Jamie’s backyard when someone shouted, ‘We need popsicles, stat!’ Honestly, I hadn’t planned on making anything elaborate, but I rummaged through the fridge, grabbed a few random ingredients, and ended up improvising these Easy Red White and Blue Popsicles.
What happened next was pure magic. The kids ran over as soon as the first batch came out of the freezer, and even the adults couldn’t resist sneaking a taste. The colors were vibrant, the flavors fresh, and the popsicles? They disappeared faster than I could fill the molds again. I remember spilling a bit of the blueberry layer on the counter (classic me, right?), but it was totally worth the mess. This recipe stuck with me ever since—not only because it’s super simple but because it brings that perfect summer vibe every time I make it. Maybe you’ve been there too, scrambling for a last-minute treat that feels special and fun? Well, let me tell you, these popsicles are your new go-to, guaranteed to bring smiles and a patriotic splash to any summer day.”
Why You’ll Love This Recipe
After countless summer gatherings and countless batches of popsicles, I can confidently say these Easy Red White and Blue Popsicles are a keeper. They’re more than just frozen treats; they’re a symbol of laid-back fun and simple joys. Here’s why you’re going to love making and sharing this recipe:
- Quick & Easy: You can whip these up in about 10 minutes, then just freeze—perfect for last-minute celebrations or when the craving hits hard.
- Simple Ingredients: No need for fancy or hard-to-find items. Most of these ingredients are probably already chilling in your fridge or pantry.
- Perfect for Patriotic Occasions: Whether it’s Fourth of July, Memorial Day, or any summer party, these popsicles scream festive fun.
- Crowd-Pleaser: Kids love them, adults love them, and honestly, they’re a hit even with the picky eaters.
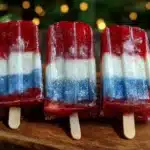
- Unbelievably Delicious: The refreshing blend of strawberries, yogurt, and blueberries hits all the right notes—sweet, tart, and creamy.
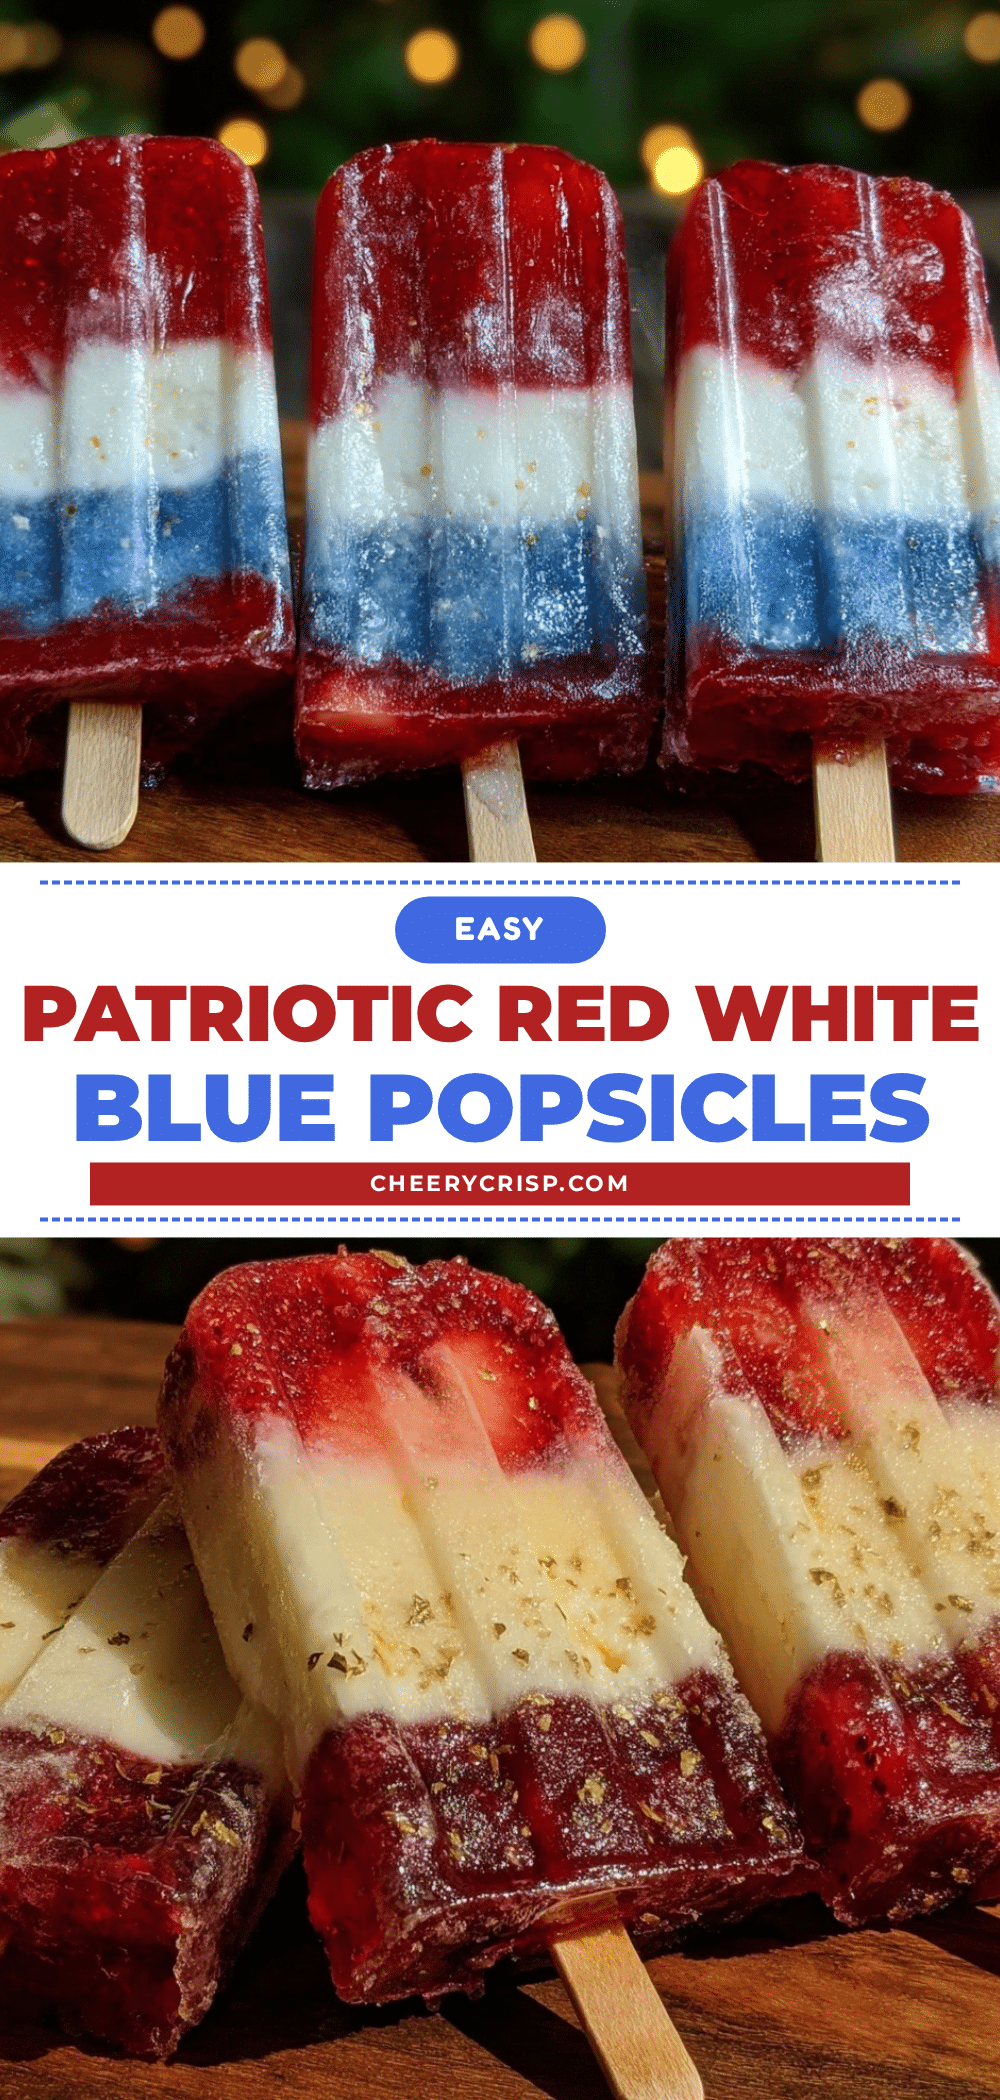
This isn’t just any popsicle recipe. The secret is in the layering—each color stays bright and distinct without mixing into a murky mess. Plus, using Greek yogurt gives it a creamy texture that feels indulgent but still fresh. I’ve tried other versions before, but none had that perfect balance of flavor and eye-catching color like this one. It’s the kind of treat that makes people close their eyes and smile after the first bite. Honestly, if you want a fuss-free summer dessert that brings a little extra joy and color to the table, this is it.
What Ingredients You Will Need
This recipe uses straightforward, wholesome ingredients to bring you a popsicle that’s both tasty and visually festive. Most items are pantry staples or fresh produce you can find year-round. Here’s what you’ll need to make your own batch of Easy Red White and Blue Popsicles:
- For the Red Layer:
- Fresh or frozen strawberries (about 1 cup, hulled and sliced)
- Granulated sugar or honey (2 tablespoons, adjust for sweetness)
- Fresh lemon juice (1 teaspoon, to brighten the flavor)
- For the White Layer:
- Plain Greek yogurt (1 cup, full-fat or 2% for creaminess)
- Honey or maple syrup (1 tablespoon, optional for added sweetness)
- Vanilla extract (½ teaspoon, for subtle warmth)
- For the Blue Layer:
- Fresh or frozen blueberries (1 cup)
- Granulated sugar or honey (2 tablespoons, depending on your fruit sweetness)
- Fresh lemon juice (1 teaspoon)
- Extras:
- Water or fruit juice (about ¼ cup, to thin fruit layers as needed)
- Popsicle molds and sticks
Pro tip: I like using organic berries when I can find them, especially from my local farmers’ market. It really makes a difference in flavor. If you prefer, swap the plain Greek yogurt for a dairy-free coconut yogurt to keep it vegan-friendly. Also, if fresh berries aren’t in season, frozen work just as well—just thaw and drain excess liquid before blending. For the sweetener, honey gives a lovely floral note, but granulated sugar is perfectly fine too.
Equipment Needed
To make these patriotic popsicles, you don’t need a fancy setup—just some basic kitchen tools that most home cooks have:
- Blender or Food Processor: Essential for pureeing the fruit layers smoothly. I’ve tried a hand mixer before, but it didn’t get the same silky texture.
- Popsicle Molds: Silicone molds are my favorite because they make unmolding a breeze. If you don’t have molds, small paper cups with wooden sticks work as a budget-friendly option.
- Measuring Cups and Spoons: For accurate ingredient ratios, especially with sugar and lemon juice.
- Mixing Bowls: You’ll need a few to prepare each layer separately.
- Spatula or Spoon: For layering and smoothing out each color.
If you’re worried about cleaning, the blender is dishwasher safe, and silicone molds rinse easily under warm water. Investing in a good set of popsicle molds is definitely worth it if you plan on making frozen treats regularly. I remember once trying to use ice cube trays—it was a mess! So having the right equipment makes all the difference in both texture and presentation.
Preparation Method
- Prepare the Red Layer (About 10 minutes):
- Place 1 cup of strawberries, 2 tablespoons of sugar or honey, and 1 teaspoon of lemon juice into your blender.
- Blend until smooth. If the mixture is too thick, add 1-2 tablespoons of water to help it blend better.
- Taste and adjust sweetness if needed. Pour the strawberry puree into a bowl and set aside.
- Prepare the White Layer (About 5 minutes):
- In a separate bowl, mix 1 cup of Greek yogurt with 1 tablespoon of honey (optional) and ½ teaspoon vanilla extract.
- Stir until evenly combined and smooth. This layer should be thick but spreadable.
- Prepare the Blue Layer (About 10 minutes):
- Blend 1 cup of blueberries with 2 tablespoons of sugar or honey and 1 teaspoon of lemon juice.
- Add water if needed to thin the mixture slightly for easier layering.
- Strain the mixture through a fine sieve if you prefer a smoother texture without seeds.
- Assemble the Popsicles (About 15 minutes):
- Pour the red strawberry puree into the popsicle molds, filling each about one-third full.
- Freeze for about 30-40 minutes or until the layer is firm but not completely solid.
- Next, spoon the white yogurt mixture over the frozen red layer, filling another third of the mold.
- Freeze again for 30-40 minutes until set.
- Finally, add the blue blueberry layer on top, filling the molds to the brim.
- Insert popsicle sticks and freeze for at least 4 hours or overnight for best results.
- Unmolding Tips:
- To remove the popsicles easily, run warm water over the outside of the molds for a few seconds.
- Gently pull on the sticks while twisting slightly if needed.
One time I got impatient and tried to rush the freezing between layers—let me tell you, the colors bled together, and it looked like a patriotic mess. Patience is key here. Also, keep an eye on the freezer temperature; if it’s too low, the fruit layers can freeze too hard and crack when you add the yogurt. Trust me, I learned the hard way!
Cooking Tips & Techniques
Making these Easy Red White and Blue Popsicles successfully is all about layering and texture. Here are some tips I’ve picked up that make the difference between “meh” and “wow”:
- Use fresh or properly thawed frozen fruit: This helps keep the fruit layers vibrant and flavorful. If frozen, let them thaw slightly to avoid icy chunks.
- Sweeten to taste: Berries vary in sweetness, so taste each puree before layering and adjust sugar or honey accordingly.
- Freeze between layers: This prevents the colors from mixing and keeps each layer distinct. About 30-40 minutes per layer usually does the trick.
- Don’t overfill molds: Leave a bit of space at the top to allow for expansion as the popsicles freeze.
- Strain blueberry puree if desired: It removes seeds and gives the popsicles a smoother finish—something I prefer for kids’ treats.
- Multitask by prepping layers while others freeze: Saves time and keeps things moving smoothly.
- Experiment with yogurt thickness: Full-fat Greek yogurt offers creaminess, but you can thin it slightly with milk or juice if you want a lighter layer.
I once forgot to insert the sticks before freezing the last layer and had to improvise with toothpicks (not recommended). Lesson learned: make sure the stick is in place before the final freeze! Also, if your freezer is prone to frost buildup, cover your molds loosely with plastic wrap to prevent ice crystals from forming on the popsicles’ surface.
Variations & Adaptations
If you want to switch things up or accommodate dietary preferences, there are plenty of ways to customize this recipe:
- Dairy-Free Version: Swap out Greek yogurt for coconut or almond milk yogurt. The texture will be a bit different but still creamy and delicious.
- Low-Sugar Option: Use unsweetened fruit purees and add a natural sweetener like stevia or monk fruit extract sparingly.
- Adult Twist: Add a splash of lime juice or a bit of mint to the fruit layers for a refreshing kick. You can even mix a little vodka or rum into the yogurt layer for a boozy popsicle.
- Different Fruits: Try raspberries for red, coconut cream for white, and blackberries for blue to mix up the flavor profile.
- Layer Style: Instead of blocks of color, swirl the layers lightly for a marbled effect—just don’t overmix!
One of my favorite tweaks was adding a handful of chopped fresh mint to the strawberry layer last summer. It gave the popsicles an unexpected freshness that was a hit at our barbecue. Feel free to get creative and tailor this recipe to your taste buds or the occasion.
Serving & Storage Suggestions
These popsicles are best served straight from the freezer, ideally on a warm day when everyone is craving something cool and colorful. Present them on a platter lined with festive napkins or in a tall glass filled with ice to keep them chilled during a party.
They pair wonderfully with other summer staples like grilled chicken, fresh salads, or even a tangy lemonade. For a full patriotic spread, you might want to check out my crispy garlic chicken recipe, which goes great with these popsicles for a casual backyard feast.
Store leftover popsicles in an airtight container or tightly sealed plastic bag in the freezer for up to two weeks. To re-freeze after partial melting, just pop them back in immediately, but be aware the texture might get slightly icier.
When reheating—the popsicles themselves don’t reheat, but if you want to soften them quickly, a few seconds under warm running water works perfectly without melting them too much. Flavors tend to remain fresh even after a few days, but that fresh fruit zing is best enjoyed within the first week.
Nutritional Information & Benefits
Each popsicle is approximately 80-100 calories, depending on the size of your molds and the amount of sweetener used. They’re a refreshing, guilt-free treat packed with antioxidants from the fresh berries and a good dose of protein from the Greek yogurt.
The strawberries and blueberries provide vitamin C and fiber, supporting immune health and digestion. Greek yogurt adds calcium and probiotics, which are great for gut health. Plus, this recipe is naturally gluten-free and can easily be made dairy-free for those with allergies or sensitivities.
From my experience as a home cook with a nutritionist’s curiosity, this recipe strikes a nice balance between indulgence and nourishment—perfect for those summer days when you want to enjoy a treat that feels wholesome too.
Conclusion
So there you have it—Easy Red White and Blue Popsicles that bring a pop of color, flavor, and fun to your summer celebrations. Whether you’re throwing a big party or just craving a simple, refreshing snack, this recipe fits the bill with minimal fuss and maximum enjoyment. I love how it turns ordinary ingredients into something special that everyone can enjoy, and I’m sure you’ll find the same joy making and sharing it.
Feel free to tweak the recipe to your liking, add your own twist, and most importantly, have fun with it. If you try these popsicles, I’d love to hear how they turned out and what variations you came up with—drop a comment below or share your photos! Here’s to many cool, colorful, and happy summer moments ahead.
Frequently Asked Questions
Can I use frozen fruit instead of fresh?
Absolutely! Just thaw the fruit first and drain any excess liquid to avoid icy popsicles. Frozen berries often work just as well and are a great year-round option.
How long do these popsicles take to freeze completely?
For best results, freeze the assembled popsicles for at least 4 hours, preferably overnight, to ensure they’re fully set and easy to remove from molds.
Can I make these popsicles without yogurt?
You can skip the yogurt and just use fruit purees, but the creamy white layer adds great texture and flavor. For a dairy-free option, try coconut or almond milk yogurt instead.
What if I don’t have popsicle molds?
Small paper cups or silicone muffin liners work fine. Just insert wooden sticks once the mixture is partially frozen to keep them upright.
How do I prevent the layers from mixing together?
Freeze each layer separately until firm but not rock hard before adding the next. This helps keep the colors distinct and prevents bleeding.
Pin This Recipe!
Easy Red White and Blue Popsicles
A quick and festive recipe for patriotic summer popsicles featuring layered strawberry, Greek yogurt, and blueberry flavors that are refreshing and crowd-pleasing.
- Prep Time: 20 minutes
- Cook Time: 5 minutes
- Total Time: 4 hours 25 minutes
- Yield: 6 popsicles 1x
- Category: Dessert
- Cuisine: American
Ingredients
- 1 cup fresh or frozen strawberries, hulled and sliced
- 2 tablespoons granulated sugar or honey (adjust for sweetness)
- 1 teaspoon fresh lemon juice
- 1 cup plain Greek yogurt (full-fat or 2%)
- 1 tablespoon honey or maple syrup (optional)
- ½ teaspoon vanilla extract
- 1 cup fresh or frozen blueberries
- 2 tablespoons granulated sugar or honey (adjust for sweetness)
- 1 teaspoon fresh lemon juice
- About ¼ cup water or fruit juice (to thin fruit layers as needed)
- Popsicle molds and sticks
Instructions
- Prepare the Red Layer: Blend 1 cup strawberries, 2 tablespoons sugar or honey, and 1 teaspoon lemon juice until smooth. Add 1-2 tablespoons water if too thick. Adjust sweetness to taste and set aside.
- Prepare the White Layer: Mix 1 cup Greek yogurt with 1 tablespoon honey (optional) and ½ teaspoon vanilla extract until smooth and spreadable.
- Prepare the Blue Layer: Blend 1 cup blueberries, 2 tablespoons sugar or honey, and 1 teaspoon lemon juice. Add water if needed to thin. Strain through a fine sieve for a smoother texture if desired.
- Assemble Popsicles: Pour red strawberry puree into molds filling one-third. Freeze 30-40 minutes until firm but not solid.
- Spoon white yogurt mixture over red layer filling another third. Freeze 30-40 minutes until set.
- Add blue blueberry layer on top, filling molds to the brim. Insert sticks and freeze at least 4 hours or overnight.
- To unmold, run warm water over molds briefly and gently pull sticks while twisting if needed.
Notes
Freeze each layer until firm but not rock hard to prevent colors from mixing. Use fresh or properly thawed frozen fruit for best flavor and texture. Strain blueberry layer for a seedless finish. Insert sticks before final freeze. Silicone molds recommended for easy unmolding.
Nutrition
- Serving Size: 1 popsicle
- Calories: 90
- Sugar: 14
- Sodium: 40
- Fat: 2
- Saturated Fat: 1
- Carbohydrates: 18
- Fiber: 2
- Protein: 3
Keywords: popsicles, patriotic, summer treats, red white and blue, frozen dessert, Greek yogurt, berry popsicles, easy recipe