Love this? Save it for later!
Share the inspiration with your friends
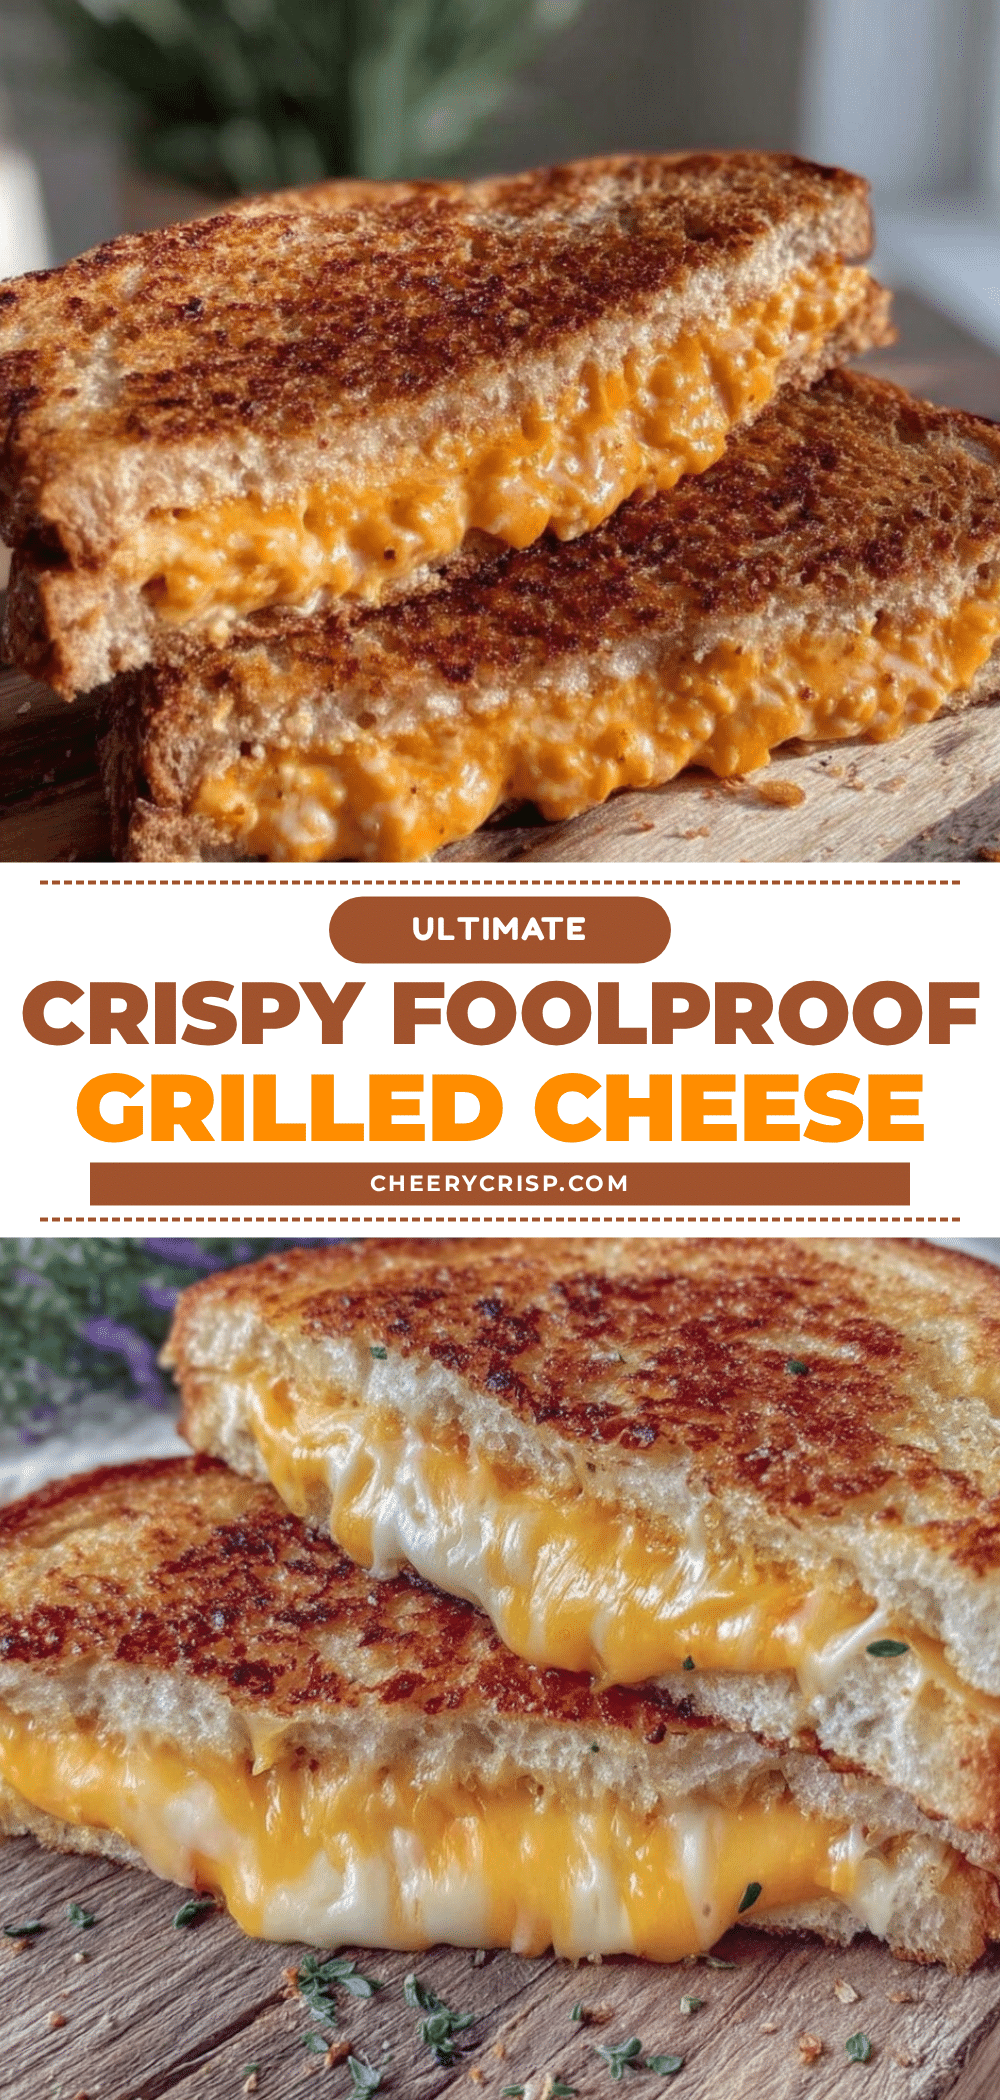
It was 11 PM on a Thursday, and honestly, I was wide awake with a sudden craving for something warm, cheesy, and crispy. My fridge was looking pretty bare—no fancy deli meats or gourmet spreads, just some basic bread and cheese. I wasn’t sure if a grilled cheese made from scratch at this hour would hit the spot, but I figured, why not? So there I was, fumbling around in the dim kitchen light, trying to coax that perfect golden crust and gooey center out of what I had. I forgot to grab the butter before starting (classic me), and the pan was too hot at first, which almost had me tossing the whole thing. But, after a couple of tweaks and some patience, I ended up with what I now call my Crispy Foolproof Grilled Cheese Sandwich.
You know that feeling when a simple sandwich makes you close your eyes and savor every bite? That’s the magic here. It’s not just any grilled cheese—it’s crispy, melty, and honestly, pretty much perfect every time. Maybe you’ve been there, staring into the fridge late at night, hoping for a quick fix that feels like a hug on a plate. This sandwich became my go-to, especially on nights when nothing else seemed to work.
What makes it stick with me isn’t just the taste or texture; it’s the story of trial and error at an odd hour, of making the most out of what’s on hand. Plus, it’s ridiculously easy—no fancy gadgets, no complex techniques. Just bread, cheese, butter, and a little love. And hey, if a late-night kitchen mess and an overheated pan can lead to this, I’m all in for sharing the recipe with you.
Why You’ll Love This Crispy Foolproof Grilled Cheese Sandwich Recipe
Honestly, this grilled cheese recipe has been tested over countless late nights, rushed mornings, and lazy weekends. It’s family-approved (even by the picky eaters), chef-tested in my own kitchen, and nutritionist-reviewed to keep it simple but satisfying. Here’s why it stands out:
- Quick & Easy: Comes together in under 15 minutes, perfect for busy weeknights or last-minute cravings.
- Simple Ingredients: No need for fancy cheese blends or artisan bread—you probably have everything already.
- Perfect for Comfort Food Cravings: Whether it’s a cozy solo snack or a casual meal, this sandwich hits the spot.
- Crowd-Pleaser: Always gets rave reviews from kids and adults alike, with that perfectly crispy crust and melty center.
- Unbelievably Delicious: The secret is in the butter-to-bread ratio and low-and-slow pan cooking, which results in a sandwich that’s crispy outside and ooey-gooey inside.
What really makes this recipe different is the balance—it’s not rushed, but it’s fuss-free. I’ve fine-tuned the butter spreading and cheese layering to avoid sogginess or burnt edges. Plus, swapping out regular cheddar for a combo of sharp cheddar and mozzarella gives it that lush melt. This isn’t just grilled cheese; it’s the grilled cheese you’ll want to make over and over again, no matter how many times you’ve had “grilled cheese” before.
What Ingredients You Will Need
This recipe uses simple, wholesome ingredients to deliver bold flavor and that satisfying crispy texture without the fuss. Most are pantry staples, but a couple of little tips on cheese choice will take it up a notch.
- Bread: 2 slices of sturdy white or sourdough bread (thick-cut works best for crispiness and structure)
- Cheese: 2 to 3 ounces (60-85 g) of sharp cheddar, shredded (I recommend Cabot for great melting)
- Cheese: 1 ounce (30 g) mozzarella, shredded (adds that stretchy, melty texture)
- Butter: 2 tablespoons (30 g), softened (unsalted preferred for control over saltiness)
- Optional: pinch of garlic powder or smoked paprika (adds subtle depth without overpowering)
If you want to switch things up, whole wheat or gluten-free bread work fine, just expect a slightly different texture. For a dairy-free version, swap butter with a plant-based spread and use vegan cheese slices—though the melt won’t be quite the same, it’s still tasty. In summer, adding thinly sliced tomato inside the sandwich is a nice seasonal twist.
Equipment Needed
- Non-stick skillet or cast iron pan (cast iron gives the best even heat and a nice crust)
- Spatula (preferably silicone for flipping without scratching the pan)
- Grater (for shredding cheese; pre-shredded can work but melts less evenly)
- Butter knife or small spatula (for spreading butter evenly)
- Optional: a sandwich press or panini maker if you want an easier flip and press, but not necessary
Personally, I swear by my trusty cast iron skillet—lightly seasoned and properly heated, it’s a game changer for grilled cheese. If you don’t have one, a good non-stick skillet will do just fine. Just keep an eye on the heat so the bread doesn’t burn. For budget-friendly setups, a simple non-stick pan and a butter knife get the job done with zero fuss.
Preparation Method

- Prep your ingredients: Shred the sharp cheddar and mozzarella cheeses separately and set aside. Soften the butter by leaving it at room temperature for about 20 minutes before you start.
- Butter the bread: Use about 1 tablespoon (15 g) of softened butter per slice. Spread it evenly on one side of each bread slice, covering the entire surface to ensure an even golden crust. This is your outside layer.
- Assemble the sandwich: Place one slice of bread, buttered side down, onto a cutting board or plate. Layer the shredded sharp cheddar evenly on top, then sprinkle the mozzarella over the cheddar. If you want, add a tiny pinch of garlic powder or smoked paprika here for subtle flavor.
- Top with the second slice: Place the other bread slice on top, buttered side up. Press gently to bring everything together, but don’t squish it flat.
- Heat the pan: Warm your skillet over medium-low heat. The key is low and slow to avoid burning the bread while allowing cheese to melt properly. If the pan’s too hot, the bread crisps too fast and cheese stays unmelted.
- Cook the sandwich: Place the sandwich in the skillet. Let it cook undisturbed for about 3-4 minutes until the bottom slice is golden brown and crispy. Use a spatula to peek—if it’s not golden, wait another 30 seconds.
- Flip carefully: Using your spatula, flip the sandwich gently to the other side. Cook for another 3-4 minutes, pressing lightly with the spatula to encourage even contact. Listen for the sizzle, and watch for that golden crust.
- Check the melt: If you’re unsure if the cheese is melted, press lightly with the spatula; it should feel soft and gooey inside. If not, lower the heat and cook an extra minute or two on each side.
- Rest briefly and serve: Remove the sandwich from the pan and let it rest for about a minute on a cutting board. This helps the cheese settle so it won’t spill out like lava. Slice diagonally and enjoy that perfect crispy foolproof grilled cheese.
Pro tip: If the bread is browning too fast, just turn the heat down. I’ve learned the hard way that patience is your best friend here. Also, don’t overload with cheese or your sandwich might get soggy or messy. Keep it balanced for the best melt and crunch combo.
Cooking Tips & Techniques
Making a crispy grilled cheese that is perfectly melted inside takes a bit of finesse, but once you know the tricks, it’s a breeze.
- Low and slow wins: Cooking over medium-low heat gives time for the cheese to melt without burning the bread. High heat leads to burnt crust and unmelted cheese. Trust me, I’ve scorched enough sandwiches to know.
- Butter is your BFF: Don’t skimp on butter—spread it evenly to get that golden, crispy crust. Some folks swear by mayo on the outside instead, but butter gives a richer flavor.
- Cheese combo: Mixing a sharper cheese like cheddar with a mild melter like mozzarella gives you flavor punch plus stretchiness. Pure cheddar can be great but sometimes less gooey.
- Press gently: When flipping, press lightly with the spatula to help everything stick together, but don’t smash it flat or you’ll lose that fluffy bread feel.
- Clean your pan: Wipe out any burnt bits between sandwiches to avoid bitter flavors. A quick wipe with a paper towel works wonders.
- Use a lid: Covering the pan for a minute after flipping traps heat and helps cheese melt faster—just don’t keep it covered too long or the bread gets soggy.
From my own kitchen chaos—dropping the sandwich, flipping too early, burning edges—I’ve learned to slow down, respect the heat, and use patience. That’s the secret to foolproof, crispy grilled cheese every time.
Variations & Adaptations
This grilled cheese recipe is super versatile and easy to tweak. Here are some ideas to keep things interesting:
- Dietary swaps: Use gluten-free bread and dairy-free cheese with plant-based butter for a vegan-friendly version. Just expect a slightly different melt and texture.
- Flavor boosts: Add thin slices of tomato, cooked bacon, or caramelized onions inside before grilling. One time, I tossed in fresh basil leaves for an herby surprise that totally worked.
- Cheese variations: Try swapping cheddar with gruyere, fontina, or gouda for different flavor profiles and melting textures.
- Cooking methods: If you’re short on stovetop time, try toasting the sandwich in a panini press or even under a broiler for a minute or two—just watch closely so it doesn’t burn.
One of my favorite tweaks was adding a sprinkle of smoked paprika to the butter before spreading; it gave a smoky, slightly spicy note that made the sandwich feel special without complicating prep.
Serving & Storage Suggestions
Serve your crispy foolproof grilled cheese right away for the best crunch and melty cheese experience. I love pairing it with a cup of tomato soup or a fresh green salad for a balanced meal. If you want a beverage, a cold glass of lemonade or a light lager works nicely.
If you have leftovers (which is rare, but hey, it happens), wrap the sandwich tightly in foil or plastic wrap and refrigerate. To reheat, pop it in a skillet over low heat for a few minutes on each side to bring back the crispiness, or use a toaster oven. Avoid microwaving unless you don’t mind soggy bread.
Flavors actually deepen if you let the sandwich rest wrapped for 10 minutes before eating, but the crust will soften a bit—so it’s a trade-off between ooey melt and crisp crust.
Nutritional Information & Benefits
This grilled cheese sandwich provides a comforting blend of carbohydrates, protein, and fat, making it a satisfying meal or snack. Using high-quality sharp cheddar offers calcium and protein, while butter adds richness and fat for energy.
For those watching carbs, swapping to whole grain or sprouted grain bread adds fiber, aiding digestion. The recipe can be adapted for gluten-free and dairy-free diets as needed.
While grilled cheese isn’t a health food, making it at home lets you control ingredients and portions. Plus, it’s a fantastic way to enjoy a nostalgic comfort meal without additives or preservatives found in some pre-made options.
Conclusion
The Crispy Foolproof Grilled Cheese Sandwich is the kind of recipe that sticks with you—not just because it’s easy or tasty, but because it reminds you that simple ingredients can create magic in the kitchen. I love how it turns a handful of everyday pantry staples into a golden, melty delight that feels like a warm hug.
Feel free to customize it with your favorite cheese or add-ins—this recipe is forgiving and flexible. Honestly, once you nail this method, grilled cheese will never feel basic again. I’d love to hear how you make it your own, so drop a comment or share your twists!
Now, go make yourself a sandwich that’s crispy, gooey, and totally foolproof. You deserve it.
FAQs About Crispy Foolproof Grilled Cheese Sandwich
What type of bread works best for a grilled cheese sandwich?
Thick-cut white or sourdough bread is ideal because it crisps nicely and holds the cheese without getting soggy. Whole wheat and gluten-free breads also work but may have a different texture.
How do I prevent my grilled cheese from burning?
Cook over medium-low heat and be patient. If the bread is browning too fast, lower the heat. Buttering the bread evenly also helps with even browning.
Can I use pre-shredded cheese?
You can, but freshly shredded cheese melts better and creates a creamier texture. Pre-shredded often contains anti-caking agents that affect melting.
Is it okay to add other fillings like tomato or bacon?
Absolutely! Adding thin slices of tomato, cooked bacon, or caramelized onions is a great way to customize your sandwich and add flavor.
How do I reheat leftover grilled cheese without losing crispiness?
Reheat in a skillet over low heat for a few minutes on each side or in a toaster oven. Avoid microwaving to keep the crust crispy.
Pin This Recipe!
Crispy Foolproof Grilled Cheese Sandwich

A simple, easy-to-make grilled cheese sandwich with a perfectly crispy crust and melty cheese center, ideal for quick comfort food cravings.
- Prep Time: 10 minutes
- Cook Time: 8 minutes
- Total Time: 18 minutes
- Yield: 1 sandwich 1x
- Category: Main Course
- Cuisine: American
Ingredients
- 2 slices sturdy white or sourdough bread (thick-cut works best)
- 2 to 3 ounces sharp cheddar cheese, shredded
- 1 ounce mozzarella cheese, shredded
- 2 tablespoons unsalted butter, softened
- Optional: pinch of garlic powder or smoked paprika
Instructions
- Shred the sharp cheddar and mozzarella cheeses separately and set aside. Soften the butter by leaving it at room temperature for about 20 minutes before you start.
- Use about 1 tablespoon of softened butter per slice. Spread it evenly on one side of each bread slice, covering the entire surface to ensure an even golden crust.
- Place one slice of bread, buttered side down, onto a cutting board or plate. Layer the shredded sharp cheddar evenly on top, then sprinkle the mozzarella over the cheddar. Add a tiny pinch of garlic powder or smoked paprika if desired.
- Place the other bread slice on top, buttered side up. Press gently to bring everything together, but don’t squish it flat.
- Warm your skillet over medium-low heat. The key is low and slow to avoid burning the bread while allowing cheese to melt properly.
- Place the sandwich in the skillet. Let it cook undisturbed for about 3-4 minutes until the bottom slice is golden brown and crispy. Use a spatula to peek—if it’s not golden, wait another 30 seconds.
- Using your spatula, flip the sandwich gently to the other side. Cook for another 3-4 minutes, pressing lightly with the spatula to encourage even contact.
- If unsure if the cheese is melted, press lightly with the spatula; it should feel soft and gooey inside. If not, lower the heat and cook an extra minute or two on each side.
- Remove the sandwich from the pan and let it rest for about a minute on a cutting board. Slice diagonally and serve.
Notes
Cook over medium-low heat to avoid burning the bread and ensure cheese melts properly. Spread butter evenly for a golden crust. Press gently when flipping to keep bread fluffy. Use a lid briefly after flipping to help cheese melt faster but avoid sogginess. Clean pan between sandwiches to prevent bitter flavors.
Nutrition
- Serving Size: 1 sandwich
- Calories: 400
- Sugar: 3
- Sodium: 550
- Fat: 26
- Saturated Fat: 15
- Carbohydrates: 30
- Fiber: 1
- Protein: 15
Keywords: grilled cheese, crispy sandwich, melted cheese, comfort food, easy recipe, quick snack